How to Replace an Inner Tie Rod Boot
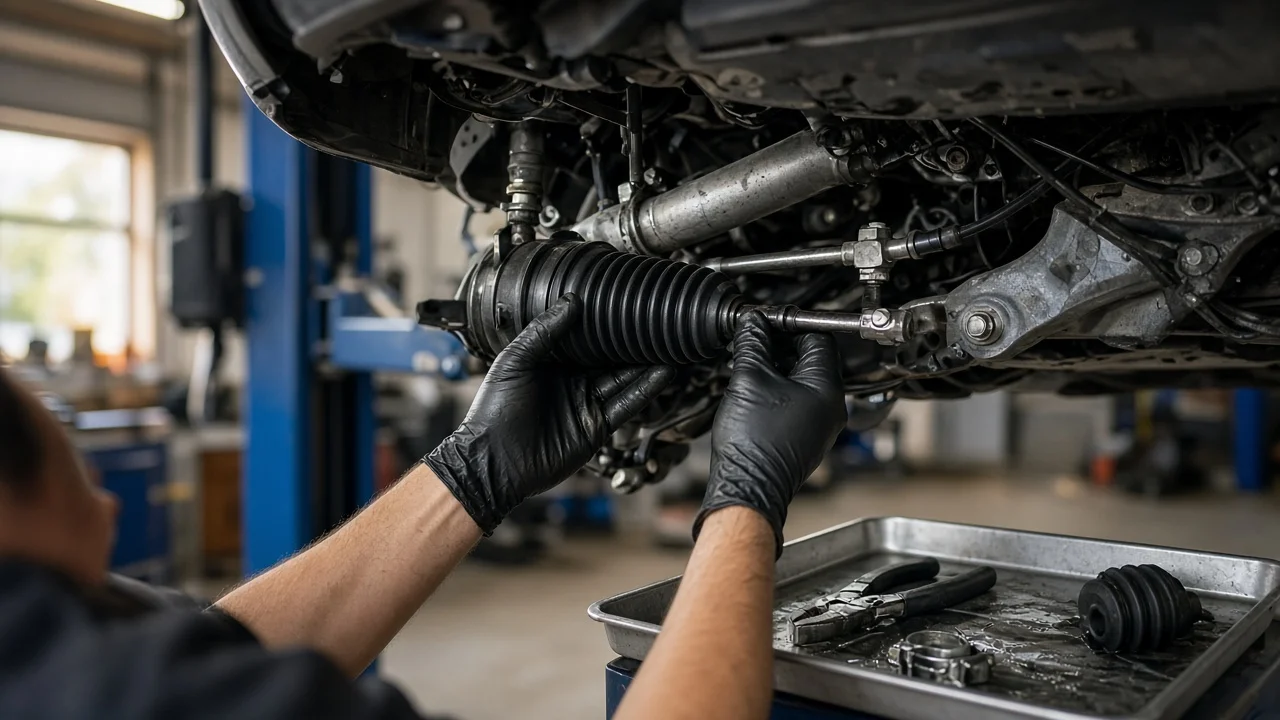
The inner tie rod boot, also called a rack boot or steering bellows, keeps water, grit and road salt away from the inner tie rod joint and the end of the steering rack. A split or loose boot lets contamination in quickly, so replacing it early can protect a far more expensive part. This guide covers inner tie rod boot replacement on a typical rack-and-pinion system. Your vehicle's service information governs every specification and model-specific step.
Confirm the part and repair scope
Rack boots differ in length, end diameters, pleat count and clamp style. Some connect to a breather tube that links the left and right boots. Order the boot by year, make, model, engine and steering type, because manual, hydraulic and electric racks on the same model can use different bellows. Check whether the kit includes clamps and whether they match the original type. Ear clamps, band clamps and wire-style clamps each need their own installation method. OE-style one-piece boots generally seal better than universal split designs.
Make sure a new boot will actually solve the problem. On a hydraulic rack, a boot that is wet inside or bulging with power steering fluid points to leaking internal rack seals. A boot cannot fix that, and the rack needs repair or replacement. Also check the inner joint for play. With the wheel off the ground, grip the tire at the three and nine o'clock positions and push and pull while a helper watches the inner tie rod. Movement or a clunk at the inner joint means it is worn. If the boot has been torn long enough for rust or grit to reach the joint, replace the inner tie rod at the same time. The disassembly is largely the same.
Prepare tools and safe access
You will need a floor jack, rated jack stands, wheel chocks and a lug wrench. You will also need wrenches that fit the jam nut and the flats on the inner tie rod, a tie rod end puller, and pliers for the cotter pin. Add the correct clamp tool, side cutters, a torque wrench, a paint marker, rags and cleaner. Before starting, look up the fastener specification for the tie rod end stud nut, jam nut and lug nuts in your service information. Also check whether any nut or cotter pin is single-use, which clamp type is required, and whether any grease is called for inside the boot.
Proper vehicle support comes first. Park on level, solid ground, set the parking brake and chock the wheels on the opposite axle. Lift only at the manufacturer's jacking points. Lower the car onto stands placed at approved mounting points, and never work under a vehicle held only by a jack. Keep the steering wheel pointed straight ahead throughout the job. Steering parts are safety-critical. Seized fasteners, a stubborn tapered stud or no access to a torque wrench are good reasons to let a qualified shop do the work. Avoid using heat near rubber boots and seals.
Remove without avoidable damage
Remove the wheel and clean the exposed tie rod threads. Mark the jam nut's position on the threads with paint, or measure from a fixed reference. This helps you return toe close to where it was. Hold the inner tie rod flats with one wrench while loosening the jam nut with another, so the force doesn't twist the inner joint or the rack. Remove the cotter pin and nut from the outer tie rod end stud. Then use a puller to free the tapered stud from the steering knuckle. Avoid hammering on the threads, and don't use a pickle fork if you plan to reuse the outer end, since it can tear that joint's dust seal.
Unscrew the outer tie rod end from the inner rod, counting full turns, and write the number down for that side. Remove the jam nut. Cut or release both boot clamps, taking care not to nick the rack housing or the rod. Slide the old boot off. Note how it sat: the large end in its groove on the rack housing, the small end in its groove on the tie rod, and the position of any breather tube. Wipe out old grease and debris and inspect the area. Rust, pitting, fluid or a gritty inner joint means more repair is needed before a new boot goes on.
Install and restore the system
Apply grease only if your service information specifies it and use the type it names. Slide the new boot over the tie rod and seat the large end fully in the housing groove. Then seat the small end in its groove on the rod, and connect the breather tube if your rack uses one. With the wheels straight ahead, the pleats should sit evenly and the boot should not be twisted, stretched or kinked. Install the clamps with the proper tool. Crimp ear clamps completely or tighten band clamps as directed. Position each clamp so it cannot contact other parts as the steering moves.
Thread the jam nut back to your mark and screw the outer tie rod end on by the same number of turns you counted. Fit the stud into the knuckle and tighten the nut to its specification. Install a new cotter pin, or a new self-locking nut where required. If the castle nut slots don't line up, follow the service information for how to align them rather than backing the nut off by guesswork. Orient the outer end as it was originally, then tighten the jam nut to specification while holding the inner rod flats. Refit the wheel, lower the vehicle and torque the lug nuts.
Counting turns gets toe close, but it is not an accurate setting. Toe is measured with the vehicle resting at its normal ride height, so it can't be set correctly with the wheels in the air. Schedule a professional wheel alignment soon after the repair instead of adjusting by eye.
Check the completed work
Before driving, turn the steering from lock to lock while watching the new boot. It should extend and compress evenly without twisting, rubbing on nearby parts or pulling out of either groove. Confirm that the clamps are tight, the cotter pin or locking nut is in place, and the jam nut is secure. On a hydraulic system, check the fluid level and look for leaks.
Take a short, low-speed test drive. Note whether the steering wheel sits centered, whether the car pulls, and whether you hear clunks over bumps or while turning. An off-center wheel or a pull usually means the vehicle needs alignment. Knocking or looseness calls for further diagnosis of joint play, rack mounting points or other steering and suspension parts. A boot that slips off or splits again quickly suggests the wrong part, a poor clamp or interference with another component. Fluid that later collects in the boot signals a rack seal leak. Inspect the boot again after a few days of driving to confirm it is still seated and dry.