How to Replace a Radiator Hose and Its Clamps Step by Step
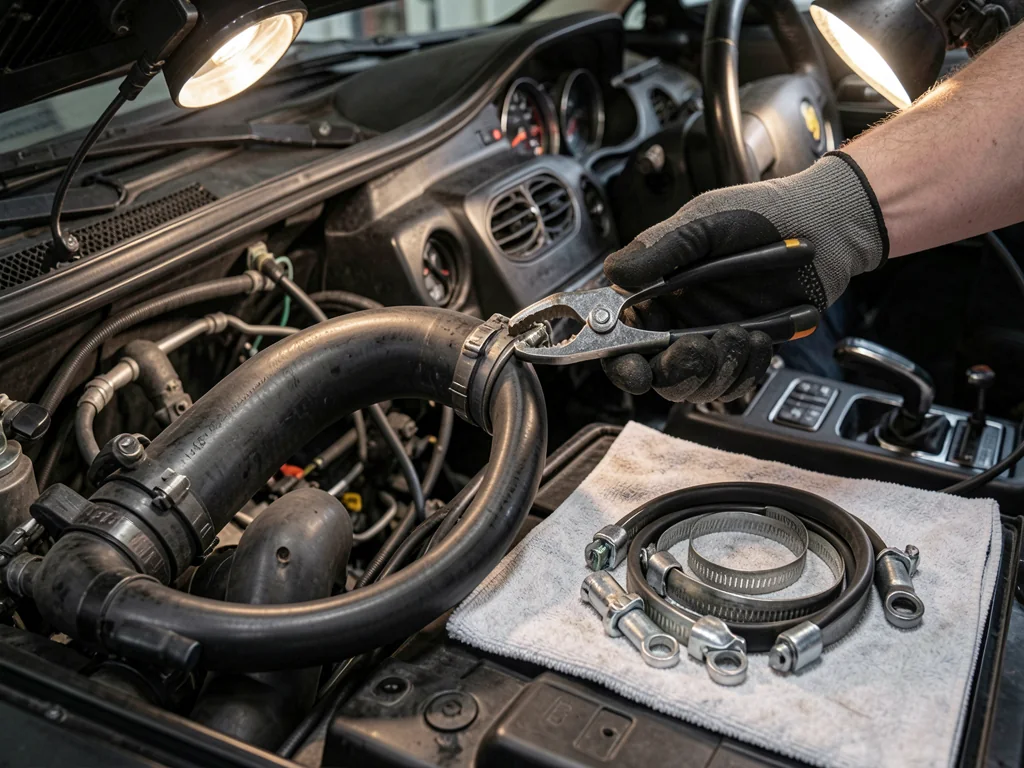
A radiator hose carries hot, pressurized coolant between the engine and radiator, so a worn hose can quickly leave you on the roadside with an overheating engine. Replacing one is a manageable job at home if the engine is cold and your tools are ready. This guide covers draining the coolant, releasing stubborn clamps, fitting and securing the new hose, and refilling the system without trapping air.
When a Radiator Hose Needs Replacing and How to Prepare Safely
Rubber hoses often break down from the inside, so squeeze each one while the engine is cold. A hose that feels soft, spongy or crunchy, shows cracks near its bends, or bulges near a clamp has lost strength. Crusty white, green or pink residue at the radiator neck or engine outlet points to seepage. A sweet coolant smell after a drive often means a small leak is dripping onto hot parts. Tape and sealant products might get you home, but they don't fix the problem. A weakened hose should be replaced, not patched.
Never open the radiator cap, the reservoir cap or any hose on a warm engine. The system is under pressure, and hot coolant can spray out and scald you. Wait until the upper hose is cool to the touch. Gather the replacement hose, new clamps, a drain pan, the coolant type specified for your vehicle, rags, gloves and eye protection. Hose routing, drain locations and coolant chemistry vary widely between vehicles, so check the owner's manual or a vehicle-specific reference before you loosen anything.
Draining Coolant and Removing the Old Hose
Find the radiator drain petcock, which is often at a lower corner, or plan to use the lower hose connection as your drain point. For an upper radiator hose, you usually only need to drop the coolant below that hose, not empty the whole system. Open the drain slowly over the pan. With the engine cool, loosen the cap to let air in so the coolant flows smoothly. Pour the old coolant into a sealed container and take it to a recycling or hazardous-waste site. Its sweet taste attracts pets, and it must never go down a drain.
Release the clamp at each end and slide it back along the hose. Twist the hose gently to break the seal before pulling. Prying against the radiator neck can crack a plastic tank. If a hose is stuck to its fitting, slit it lengthwise near the end with a utility knife, cutting away from the neck, then peel it off. Before installing anything, lay the old hose beside the new one and compare the length, the bend angles and both end diameters. A hose that looks similar but is slightly off will kink or leak.
Removing Old Clamps: Pliers and Clamp Types Explained
Many vehicles leave the factory with spring-type clamps, also called constant-tension clamps. These are bands of spring steel with two tangs that you squeeze to open the clamp. Ordinary slip-joint pliers tend to slide off those tangs, especially when the clamp sits at an angle or behind other parts. Radiator clamp pliers solve this with grooved or swiveling jaws that grip the tangs and lock the clamp open while you move it. Cable-operated versions put the jaws at the end of a flexible cable, so you can release a clamp deep in the engine bay while your hand stays in open space.
Worm-drive clamps loosen with a flat screwdriver or a small socket, and a nut driver is less likely to strip the screw head. Some vehicles use one-time crimp or ear clamps. You have to cut these off carefully without nicking the fitting, then replace them with a new clamp. Spring clamps store a lot of force, so keep your fingers clear and work in good light to avoid a painful pinch if one snaps shut. Replace any clamp that is rusted, stretched or weak rather than reusing it. A tired clamp is a common reason a new hose starts leaking.
Choosing the Right Clamp for a Radiator Hose
Size a clamp by the outside diameter of the hose after it is pushed onto the fitting, because the hose stretches and gets slightly larger. A clamp sized for the bare hose may be too small, or it may run out of adjustment before it grips. Each clamp type has its strengths. Spring clamps keep steady pressure as the hose heats and cools. Worm-drive clamps are easy to install and adjust but need an occasional check. T-bolt clamps apply strong, even force and suit large connections, but they are usually more than a typical coolant hose needs.
Clamps sit in heat and moisture, and in many regions they also face road salt. Choose stainless steel or another corrosion-resistant material so the clamp will still release cleanly years from now. Look for rolled or smooth band edges. On worm-drive clamps, look for an inner liner that covers the slots so the band doesn't chew into the rubber. Avoid narrow bands, which concentrate force into a line that can cut the hose. When possible, match the original clamp style. Constant-tension clamps follow the hose as it expands and shrinks, while screw clamps hold one fixed size.
Fitting the New Hose and Tightening the Clamps
Clean each radiator neck and engine outlet with a soft cloth or plastic scraper to remove old rubber, sealant and scale. Avoid metal tools and coarse abrasives, which can gouge plastic necks or leave scratches that turn into leak paths. Slide the clamps onto the new hose before fitting it. Then push each end onto its fitting until it passes the raised bead. A little coolant inside the hose end helps it slide on. Avoid grease or sealant, which can let the hose creep off the fitting later.
Place each clamp just behind the bead on the hose side, so the bead keeps the hose from sliding back. Turn worm-drive screw heads to face where you can reach them later. Route the hose so it doesn't rub against belts, pulleys, brackets or sharp edges. Tighten a worm-drive clamp until the hose is gripped firmly, but stop before the band bites into the rubber. Let a spring clamp close on its own and check that it sits square. Finally, reinstall any brackets, retaining clips or heat shields the original hose used.
Refilling, Bleeding Air and Checking for Leaks
Refill slowly with the specified coolant mix through either the radiator neck or the reservoir, depending on your vehicle's layout. Pouring slowly gives trapped air time to escape. Some engines have a bleed screw on a hose, the thermostat housing or the radiator. Opening it lets trapped air out, and you close it once a steady stream of coolant appears. If your vehicle's design allows it, run the engine with the cap off and the heater on high. The level will drop as the thermostat opens and air bubbles out. Top up, then reinstall the cap.
Watch the temperature gauge closely during the first warm-up. If it climbs toward hot or the heater starts blowing cold, shut the engine off and let it cool before investigating. Check each clamp for seepage once the engine is warm, again after it cools, and again the next day. Check the reservoir level each time, and snug worm-drive clamps slightly if needed. Get professional help if a leak continues after the new hose and clamps, coolant disappears with no visible source, the engine keeps overheating, or a radiator or engine fitting is cracked.