How to Read Spark Plugs: Color, Wear, and Condition Chart
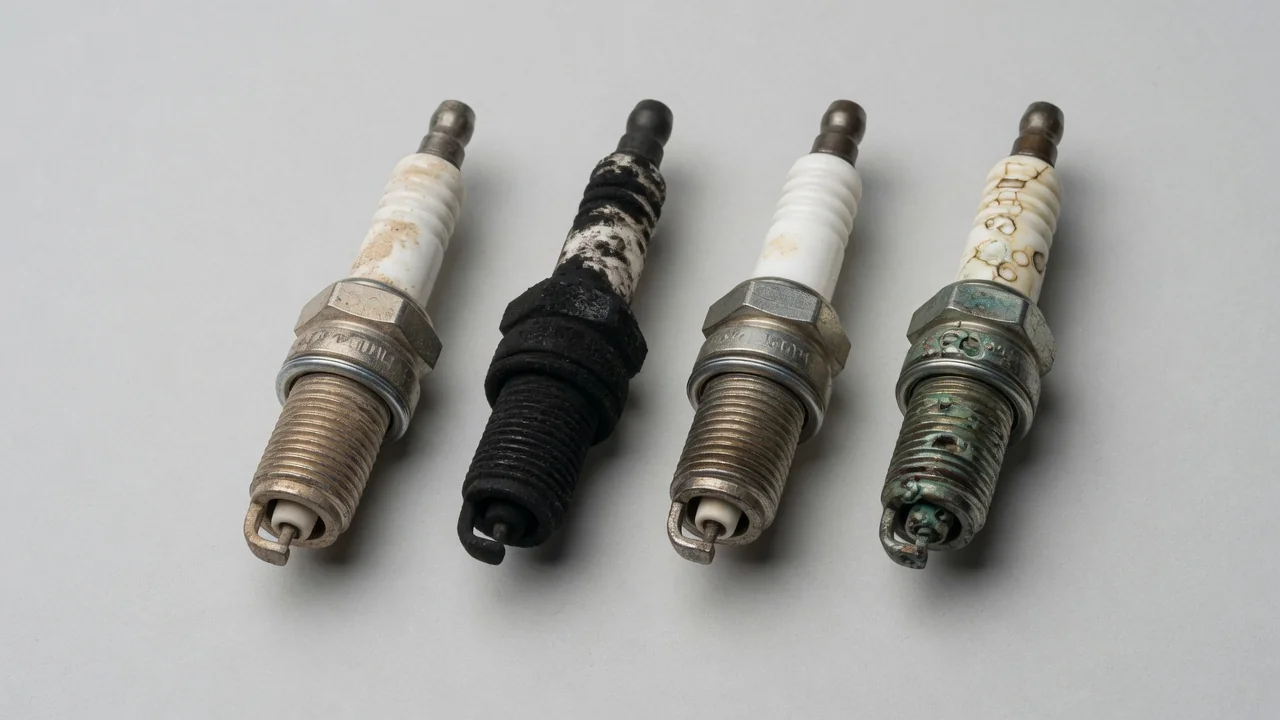
Learning how to check spark plugs after removal involves knowing what common colors and wear patterns may suggest, where a multimeter resistance test fits in, and why every finding should lead to a confirming check rather than a quick verdict. A plug's firing end records a small slice of what happened inside its cylinder, but that record is easy to misread.
Inspect Removed Spark Plugs Safely and Preserve the Evidence
Inspection should begin only after the plugs are out of the engine, the ignition is off, and everything has cooled. Removal and installation details, including access, thread care, and tightening, vary by vehicle, so those steps belong to the service instructions for that engine. Before cleaning anything, keep each plug matched to its cylinder, perhaps in a labeled tray, and photograph the firing end from several angles. Deposits flake easily, and a wire brush can erase the most useful evidence.
Under strong, even light, examine the insulator nose, center electrode, ground electrode, threads, and top terminal. A magnifier helps reveal fine cracks and edge wear. Keep expectations realistic: rough running, hesitation, or a misfire complaint does not by itself mean a plug is at fault, because coils, fuel delivery, and mechanical problems produce similar symptoms. Skip live spark tests, probing energized ignition parts, and reaching near hot components; those shortcuts risk shocks and burns while adding little reliable information.
Spark Plug Color and Condition Chart
A useful reading chart pairs each appearance with a possible meaning, its limits, and a next check. Light tan or gray deposits on the insulator nose usually suggest a plug running in a reasonable temperature range, though gap and wear still deserve review. Dry black soot may point toward rich running or short trips, so compare cylinders and review fuel trim data. White or very clean ceramic is ambiguous and warrants confirming that the specified heat range is installed.
Rounded electrodes usually reflect service wear, so measure the gap against the correct specification. Cracked ceramic, from impact or thermal stress, calls for replacement and a search for the cause. Blistered or melted firing ends signal serious heat and justify professional evaluation. Wet or oily deposits need their own diagnosis rather than a color guess. Fuel formulation, driving conditions, plug design, and what the engine did just before shutdown all shift appearance, so no single shade proves engine health.
Visible Wear and Damage That Need Attention
Bad spark plugs often show their age at the electrodes first. Sharp edges on the center electrode become rounded as spark erosion removes metal, and the ground electrode may thin, bend, or pit. Lost material widens the plug gap, which raises the voltage needed to fire. Whether a measured gap is actually too wide depends on the exact plug and vehicle specification, not a generic figure. Chipped, cracked, or missing firing-end ceramic is a more urgent defect.
Check the gap gently with a gauge suited to the plug type; wire gauges are often preferred over flat blades for worn or fine-wire tips. Slide it without prying, since precious-metal tips and thin electrodes break or deform under force, and do not bend anything unless manufacturer guidance permits adjustment. Keep perspective, too: a normal-looking plug can still misfire under load, while brownish staining on the outer ceramic, often called corona staining, does not indicate failure on its own.
What Dry Black Deposits Can Tell You
Dry, matte black soot that wipes off like powder is classic carbon fouling, and its location matters. A light haze confined to the metal shell means less than a coating spreading across the insulator nose, because conductive carbon there can create a leakage path that bleeds spark energy away before it jumps the gap. Texture matters as well: fluffy soot suggests fuel-related carbon, whereas hard, crusty buildup may point to a different deposit source worth separate attention.
Possible explanations include an overly rich mixture, incomplete combustion from a weak spark, or repeated short trips and idling that never let the tip reach self-cleaning temperature. Each needs corroboration from symptoms, scan data, or testing, because soot alone cannot single out a leaking injector, a failing coil, or a plug with the wrong heat range. Keep wet deposits separate as well; fuel-soaked or oily plugs follow a different diagnostic path than dry carbon does.
White Deposits, Blistering, and Burnt Electrodes
Pale plugs invite quick conclusions, but a white or very clean insulator does not by itself prove overheating or a lean mixture. Some fuels, additives, and plug materials leave light-colored deposits, and a recent hard run can burn a tip clean. Closer evaluation is warranted when the ceramic looks blistered, glazed, or bubbled, or when electrodes appear melted, beaded, or eroded well beyond normal wear. Those burnt features indicate temperatures beyond the plug's intended operating range.
Suspected heat damage starts with confirming that the installed plug matches the specified part and heat range for the engine. After that, relevant operating conditions such as mixture, ignition timing, cooling, and combustion stability need professional investigation rather than guesswork from a photo. If electrodes have melted, ceramic has broken, or pieces are missing, avoid further driving until someone qualified assesses the engine, because loose fragments can damage pistons, valves, or the catalytic converter.
Check Spark Plug Resistance With a Multimeter
A multimeter resistance test checks the electrical path through a removed plug, from the top terminal to the center electrode, including any internal resistor. Choose a suitable resistance range, hold one probe firmly on the clean terminal and the other on the center electrode, and avoid scraping or pressing on delicate fine-wire tips. Compare the result with the specification for that exact plug design, since resistor and non-resistor plugs have very different expectations and no universal value applies.
If a reading looks unexpected or open, verify the meter setup, check lead resistance, clean the contact points, and retest before blaming the plug. A continuity beep is not enough, because it only shows that some path exists, not whether resistance falls within specification. Even a good reading has limits. The meter applies a tiny voltage in open air, so it cannot prove reliable sparking under cylinder pressure or reveal insulation that breaks down at firing voltage.
Use Plug Findings to Choose the Next Diagnostic Step
Plug findings become useful when recorded cylinder by cylinder alongside symptoms, recent driving history, and any stored diagnostic trouble codes. Patterns matter. Similar light wear across every plug points toward age, while one sooty or damaged plug among clean neighbors narrows attention to that cylinder's ignition, fueling, or mechanical condition. A consistent condition on one bank or group of cylinders can steer testing further, but none of these patterns proves that a specific component has failed.
When evidence suggests more than routine wear, professional ignition output checks, injector evaluation, fuel trim analysis, compression testing, or a leak-down test can identify the real cause. Treat any trouble code as evidence to interpret, and confirm manufacturer-specific meanings for the exact vehicle. Replacing a fouled or damaged plug may temporarily smooth running while leaving the root problem in place, so base replacement on verified plug specifications, measured condition, and the underlying diagnosis.