How to Prioritize Structural Repairs in a Restoration
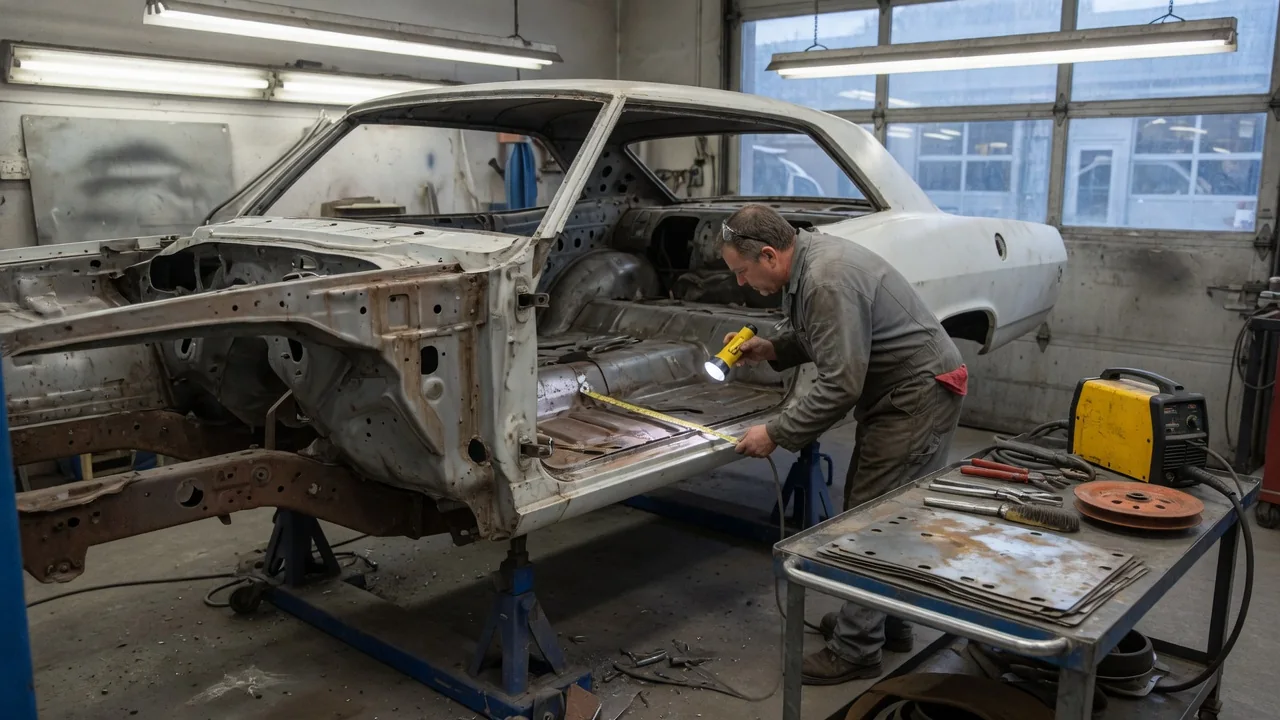
Structural repairs decide whether a restoration produces a safe, straight car or an expensive cosmetic shell. Before ordering trim or choosing paint, a sound classic car structural repair plan establishes what holds the vehicle together, how far corrosion has spread, and which jobs need professional equipment. Prioritizing comes down to a clear sequence: find the real extent of the damage, repair the parts that carry loads first, and decide early which tasks belong to a specialist rather than the home garage.
Rust assessment
Not all rust is equal, and the first job is telling the types apart. Surface rust affects only the top layer of steel and can usually be removed without losing metal. Scale rust has started to flake and pit the panel, thinning it. Penetrating rust has eaten through, leaving holes or metal so weak that a probe pushes straight through. Bubbling paint is a warning sign, because corrosion usually extends well beyond the visible blister. A pick or small screwdriver, used gently on suspect areas from both sides of the panel where possible, gives a far more honest picture than a visual check alone.
Corrosion concentrates where water, salt, and debris collect and cannot dry out. Typical places include lower sills or rocker panels, floor pans, wheel arches, jacking points, the bottoms of doors and fenders, trunk floors, seams covered by sealer, and areas around window frames where leaks run down inside the body. Blocked drain holes make every one of these worse. Previous repairs deserve extra suspicion: thick body filler, patch plates welded over rotten metal, and fresh undercoating can all hide serious damage. Stripping the shell by media blasting or chemical dipping reveals the true condition, and findings almost always grow once the metal is bare, so final repair estimates make the most sense after stripping.
As damage is found, record it systematically. Photograph each area, mark it on a simple diagram of the body, and classify it by function and severity: structural, semi-structural, or cosmetic, and light, moderate, or perforated. This map turns a vague sense that the car is rusty into a list that can be ranked. It also prevents a common mistake, which is treating a rusty outer fender with the same urgency as a rotted frame rail simply because the fender is more visible.
Load-bearing areas
Which parts carry loads depends on how the car was built. On a body-on-frame vehicle, the separate frame rails and crossmembers carry most of the suspension, drivetrain, and crash loads, with the body attached through mounts. On a unibody or monocoque car, the shell itself is the structure, so sills, floor pans and their crossmembers, inner wheelhouses, suspension towers, front and rear rails, subframe mounting points, pillars, the firewall, and the roof structure all contribute to strength and stiffness. Exactly which panels are structural varies between vehicles, so the factory service manual or body repair manual for the specific model is the right reference before cutting anything.
A practical priority order starts with the points that locate safety-critical components: suspension and steering mounts, subframe attachment points, and seat belt anchorages. Next come the main longitudinal members, such as frame rails and sills, followed by floors and crossmembers, then supporting inner panels. Outer skins and cosmetic panels come last. The reasoning is mechanical rather than aesthetic. Load-bearing sections determine wheel alignment, door and panel fit, and how the car behaves in a collision, and welding them can slightly move everything attached to them. Fitting new outer panels before the structure underneath is right usually means doing that work twice.
On a unibody shell, removing large structural sections can allow the body to sag or spread, especially when sills and floors are cut out at the same time. Bracing the door openings and the shell before cutting, replacing sections one side or one area at a time, and checking reference measurements before and after are standard precautions. Many manufacturers published body dimension charts showing measuring points and distances; where one exists for the vehicle, it is the benchmark for confirming the shell is straight. Door gaps that change as metal is removed are an early sign the structure is moving.
Specialist work
Some structural tasks depend on equipment and experience that few home workshops have. Measuring and straightening a bent frame or shell on a jig or bench, rebuilding rails and suspension mounting points, reproducing factory spot welds, and working with aluminum or other materials that need different techniques generally belong with a body shop or restoration specialist. In some jurisdictions, structural repairs may also affect roadworthiness inspections or registration, which is another reason to involve a professional and keep records of what was done.
That does not mean an owner must hand over the whole job. Rust removal, stripping, preparation, non-structural patch panels, seam sealing, and cavity protection are commonly handled at home, and confident welders often take on floor sections. The deciding factor is honest skill assessment. A weak or poorly penetrated weld on an outer panel is a cosmetic problem, while the same weld on a frame rail or suspension mount is a safety problem. Even owners doing most of the work themselves can benefit from having a specialist inspect the shell and confirm which areas are within their ability.
When specialist work is planned, sequence matters. Getting quotes after the body is stripped gives the shop an accurate view and reduces surprises. It helps to agree in writing what the work includes, whether the shell will be measured before and after, and who supplies replacement panels, since reproduction panels can vary in fit and may need adjustment. Photographs and invoices from structural repairs are useful later for inspections, insurance, and any future sale.
Practical implications and limits
Putting structure first changes how money and time flow through a project. Structural repair tends to consume a large share of the budget early, before any visible progress, which can feel discouraging but prevents spending on paint and trim that would be damaged by later welding. The assessment stage also creates a genuine decision point: when rot is extensive across many load-bearing areas, a better donor shell or a different project car may be more sensible than repairing the original. Making that call before buying parts protects the rest of the budget.
General principles only go so far. Construction methods, steel types, adhesives, and approved repair procedures differ between manufacturers and eras, so model-specific documentation should override any general rule when the two conflict. Hidden damage can still appear midway through a job, and leaving room in the schedule and budget for it is realistic rather than pessimistic. Finally, a structural repair is only as durable as the protection that follows it: clear drain holes, proper sealing, and cavity wax help keep new metal from repeating the fate of the old.