How to Install a Trailer Hitch: Steps, Fit, and Installation Cost Factors
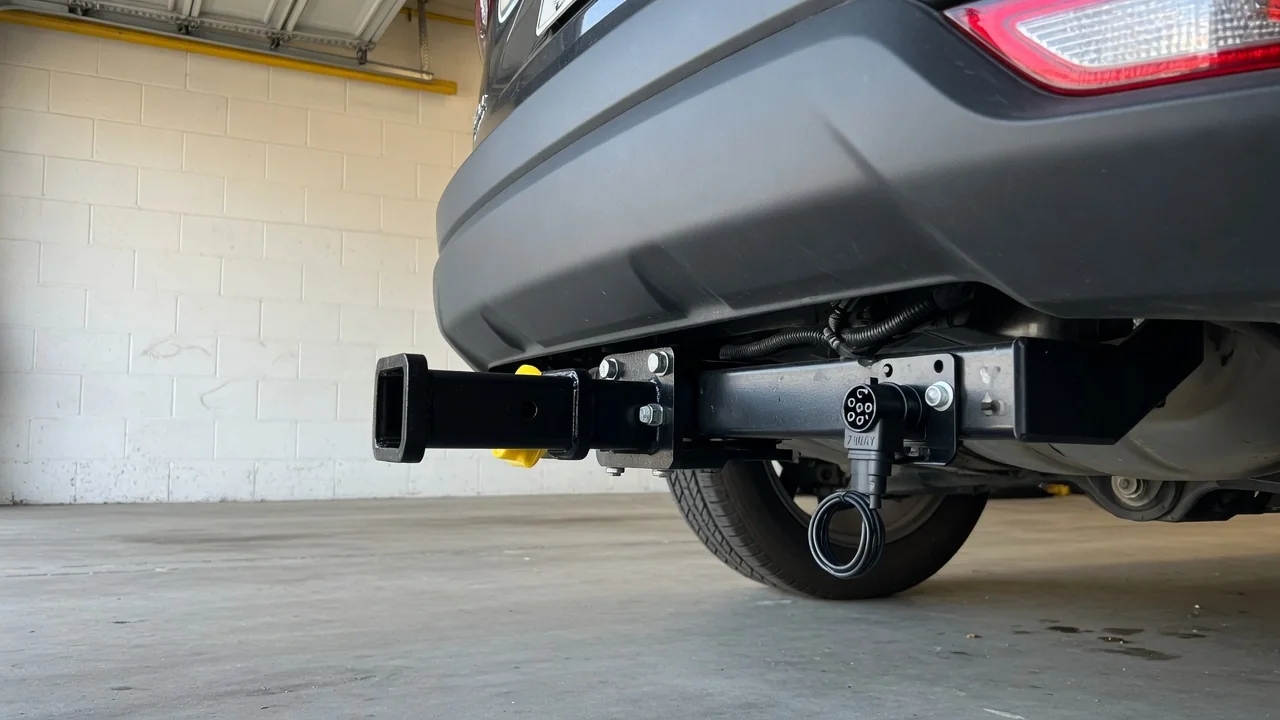
Deciding to install a trailer hitch opens up towing, bike racks, and cargo carriers, but the job involves more than a few bolts. Fit, wiring, vehicle towing limits, and labor all shape the result. This guide explains what installing a trailer hitch involves, how a typical trailer hitch install proceeds, and which factors drive trailer hitch installation cost and installed prices.
What Installing a Trailer Hitch Actually Involves
A receiver hitch is a steel assembly with a square tube that accepts a ball mount, bike rack, or cargo carrier. It bolts to mounting points on the vehicle frame or body structure, often using threaded holes or weld nuts the automaker already provided. Hitches are grouped into classes by capacity. Lighter classes generally use a smaller receiver opening, commonly 1-1/4 inches, while heavier classes typically use a 2-inch opening or larger for heavy-duty towing.
The rating stamped on a hitch describes only what the hitch can handle. It never overrides the towing capacity and tongue weight limits in the owner's manual, and the lowest-rated component in the system always sets the ceiling. Many vehicles also need work beyond the bolt-on itself. Trailer wiring, removal of underbody panels or trim, lowering the exhaust temporarily, or fascia trimming so the receiver can pass through the bumper cover may all be part of the job.
Choosing a Hitch That Fits Your Make, Model, and Year
Hitches are engineered around a particular underbody, so a vehicle-specific hitch follows the exact spacing of mounting points, the exhaust routing, the spare tire location, and the bumper shape. Make, model, and year are only the start; body style, trim level, and factory options such as sport bumpers or dual exhaust can change which part fits. Confirm the match using the hitch maker's own application information and your owner's manual rather than guessing from appearance or measurements.
Match the hitch class to what you plan to carry. A bike rack or cargo carrier places a modest load on the receiver, while a trailer brings towing capacity and tongue weight into play, and every choice must stay within the vehicle's rated limits. Do not assume a hitch from a related model, a platform sibling, or a different generation of the same vehicle will bolt up. Redesigns frequently move mounting points even when the name on the tailgate stays the same.
Overview of a Typical Trailer Hitch Install
A typical install follows a predictable sequence. The parts are checked against the instruction sheet, access is gained to the mounting points by removing panels or shields as needed, the hitch is raised into position, the fasteners are installed and tightened, and the finished work is inspected. Follow the hitch manufacturer's printed instructions and torque values exactly, and use only the supplied hardware. Substituted fasteners may not have the strength or thread engagement the design depends on.
A hitch is heavy and awkward to hold overhead, so a helper and proper support equipment matter; never work under a vehicle held up only by a jack. Some situations push the job beyond a casual driveway project: rusted or damaged weld nuts, instructions that call for frame drilling, exhaust components that interfere, or fasteners that will not seat properly. Drilling, cutting, or modifying structural parts affects the vehicle's integrity, and those cases belong with a professional installer.
Trailer Light Wiring and Electrical Considerations
Towing a trailer usually requires an electrical connection as well, because the trailer's brake, turn, and tail lights must mirror the tow vehicle's. A trailer wiring harness comes in two broad forms. Vehicle-specific plug-in harnesses connect to existing sockets in the factory wiring, while other setups require splicing into the lighting circuits or adding a power module that draws current directly from the battery. Which approach applies depends on the vehicle, so check before buying.
Some vehicles have sensitive lighting or body-control electronics that monitor circuit loads, and an improper connection can trigger warnings or malfunctions. Review vehicle-specific guidance before connecting anything. Trailers with electric brakes also need a brake controller in the cabin, and professional installation is sensible when you are unsure. Once wired, have a helper stand behind the trailer while you operate the running lights, brake lights, and each turn signal, confirming every function before driving.
What Determines Trailer Hitch Installation Cost
The cost to install a trailer hitch has two parts: components and installation labor. On the parts side, hitch class, brand, and how complex the vehicle-specific design is all move the price, with heavier-duty hitches generally costing more than light-duty ones. Wiring adds to the total, especially when a powered module is required. Accessories such as a ball mount, hitch ball, and hitch pin are often sold separately, so the trailer hitch cost and installation figure can grow quickly.
Labor depends heavily on vehicle design. A hitch that bolts to exposed frame holes takes far less time than one requiring bumper or fascia removal, heat shield or exhaust adjustments, or tight access to mounting points. Age matters too: rust, seized hardware, or unexpected drilling can extend the job beyond the first estimate. Rather than expecting one fixed trailer hitch installation price, think of a range, with simple bolt-on jobs at the low end and wiring-intensive, trim-heavy installs at the top.
Comparing Installed Prices and Getting Accurate Quotes
Trailer hitch installation prices are easy to misread because quotes cover different things. A hitch-only price is the part alone, a labor-only price assumes you supply everything, and an installed price should bundle parts, wiring, and accessories. Ask each installer what parts are included, whether wiring is part of the figure, whether the hitch is specific to your vehicle, and how unexpected rust or extra labor is handled. Give the exact make, model, year, and trim so the quote reflects the right parts.
Dealerships, hitch and trailer shops, general repair shops, and retailers that offer installation all do this work, and trailer hitch prices installed can differ among them for the same vehicle. Buying the parts yourself and paying only the price to install them may lower the total, though some shops charge differently for customer-supplied parts. The trade-off is responsibility: if the hitch does not fit or a warranty problem arises, sorting it out may fall to you rather than the installer.
After Installation: Checks Before Your First Tow
After any install, look over the work. The hitch should sit tight against its mounting surfaces with every fastener in place, clear of the exhaust and suspension components, and the receiver should be centered and level at the position shown in the instructions. Recheck the fasteners as the hitch manufacturer recommends and again after the first few trips, since hardware can settle slightly once the vehicle has been driven and loaded.
Before the first tow, confirm that the ball mount and hitch ball are rated for the trailer's weight and that the ball matches the coupler size. The hitch pin should pass fully through the receiver and be secured with its clip, and the safety chains should reach the attachment loops with enough slack to turn. If you notice clunking, visible movement, or warning messages on the dash after installation, have a professional inspect the setup before towing.