How to Disconnect Transmission Cooler Lines From a Radiator
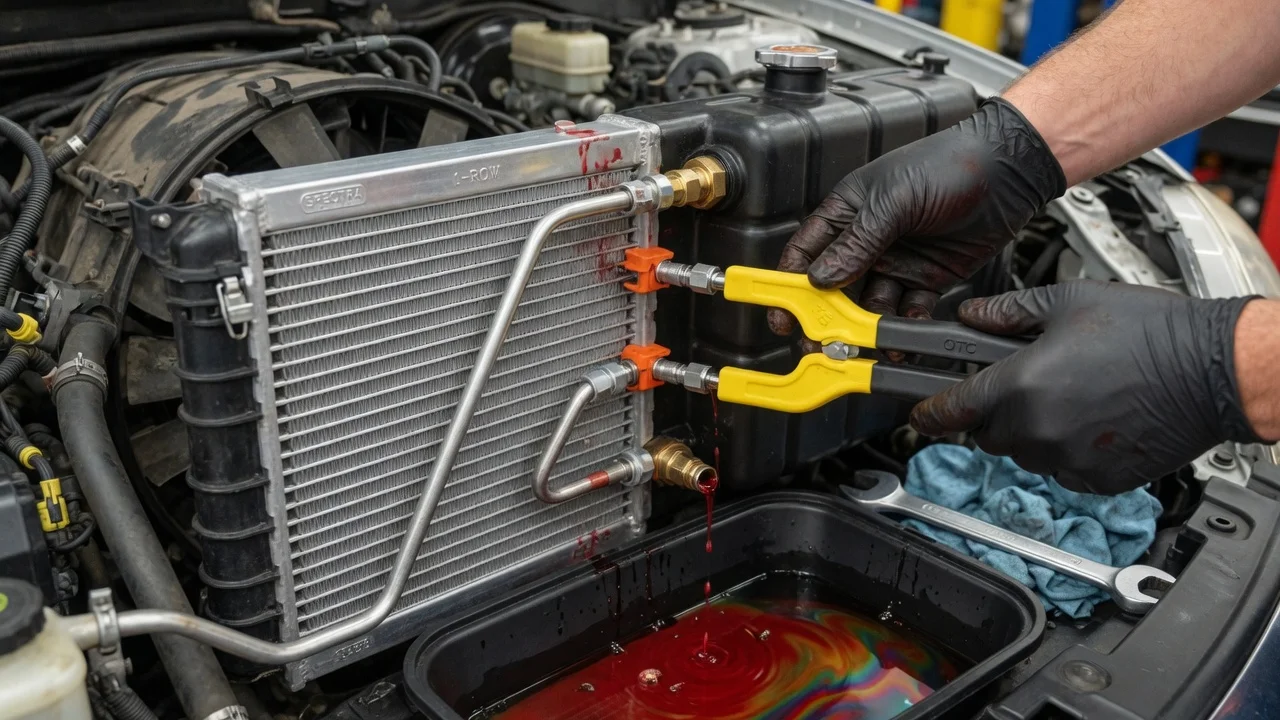
You usually need to disconnect the transmission cooler lines to replace a radiator, flush the cooler or install an auxiliary cooler. On most vehicles with an automatic transmission, the job is simple in principle but easy to get wrong. A rounded fitting, a cracked radiator neck or a lost retaining clip can turn a short job into a bigger repair. This guide explains how the connection works and how to separate the lines cleanly.
The Short Answer
Work on a cool vehicle. Place a drain pan under the radiator tank where the two lines attach. Check whether the lines use threaded tube nuts or quick-connect fittings, then clean the area. For threaded fittings, hold the radiator-side fitting steady with a backup wrench and loosen the tube nut with a flare-nut (line) wrench. For quick connects, remove the retaining clip or use the correct disconnect tool, then pull the line straight out. Expect some transmission fluid to drain. Cap both the lines and the radiator ports right away so dirt cannot get in.
You normally don't need to drain the engine coolant just to disconnect the lines, because transmission fluid and coolant flow through separate passages. Draining is only necessary if the radiator itself is coming out or the radiator fitting is damaged.
How the Transmission Cooler Connects to the Radiator
In most vehicles with an automatic transmission, the radiator has a small heat exchanger inside one of its tanks. The transmission pumps fluid through one steel line into this internal cooler. The fluid gives up heat to the surrounding coolant and returns through the second line. As long as the internal cooler is intact, the coolant and the fluid never mix. Many vehicles also send the fluid through a separate air-to-oil cooler mounted in front of the radiator, either from the factory or as an add-on.
Because the internal cooler sits inside the coolant tank, the radiator fittings are usually brass or steel threaded into a plastic or aluminum tank. That joint is the weak point. Too much force on the fitting can twist it, crack the tank or break its seal. That is why you must support the radiator side while you turn or release the line.
Fitting Types and Conditions That Change the Job
The fitting style decides the method. Threaded tube nuts appear on many older vehicles and some current trucks. They call for a flare-nut wrench, which grips several flats at once. Quick-connect fittings are common on newer vehicles. Some have an external wire or plastic clip that you pry or squeeze out, after which the line pulls free. Others, including spring-lock designs, need a plastic disconnect tool sized to the line. You push the tool into the fitting to expand an internal spring, then withdraw the line. Some setups use a threaded adapter on the radiator with a quick connect on the line end, so you may find both styles on one vehicle.
Condition matters as much as design. On older vehicles, or ones exposed to road salt, corrosion can seize the fittings. Soak them with penetrating oil, give it time to work, and apply steady pressure rather than sharp impacts. If a quick connect's plastic retainer is brittle, replace it rather than reusing a cracked part. If the line is kinked, heavily rusted or twisting along with the nut, the line itself may need replacement, not just the fitting.
Access also varies. On some vehicles you can reach the fittings from above. On others you must first remove a splash shield, the lower air deflector or the fan shroud. Some vehicles also have cooler line connections at the transmission case or a thermostatic bypass valve in the circuit. Those connections are separate from the ones at the radiator.
Step-by-Step Disconnection
Start with the engine off and cooled down, because transmission fluid can be hot enough to burn you after driving. If you need to work from underneath, raise the vehicle and support it securely on stands. Wear eye protection, since fluid can spray when a fitting releases. Note which line is the inlet and which is the outlet, or mark them with tape, so they go back in the same positions.
Clean dirt from around each fitting with a brush and shop towel. For threaded fittings, put the backup wrench on the radiator fitting hex and the flare-nut wrench on the tube nut. Turn the tube nut counterclockwise while holding the backup wrench still. Once the nut is loose, finish by hand and ease the line away without bending it. For clip-type quick connects, note how the clip sits, remove it, and pull the line straight out. Some designs require you to push the line in slightly first. For tool-release fittings, slide the correct tool over the line and into the fitting, press it in fully, and pull the line out while holding the tool in place.
Let the fluid drain into the pan, then plug or cap the open lines and radiator ports. Keep track of any O-rings, clips or retainers. Wipe up spilled fluid, since it can damage rubber parts and makes later leak checks harder. Take used fluid to a facility that accepts automotive fluids.
If the Radiator Is Coming Out Too
If you are disconnecting the lines to replace the radiator, the coolant side becomes part of the job. Never remove the pressure cap or open a drain on a hot, pressurized cooling circuit. Wait until the engine is cool and the upper hose is no longer firm before opening anything. Drain the coolant into a clean container. Once the transmission lines are free, remove the hoses, the mounts and then the radiator.
When you refill, use the coolant specification listed for your vehicle and the correct coolant concentration. Color alone does not tell you whether a coolant is compatible. Many engines need a bleeding procedure to remove air pockets, because trapped air can keep the thermostat from opening properly and cause overheating. Follow your vehicle's fill and bleed sequence, then recheck the level after the engine has cooled.
Reconnecting and Checking for Leaks
Inspect the line ends and fittings before reconnecting. Replace any damaged O-rings or retainers with the correct parts. Start threaded tube nuts by hand to avoid cross-threading. Then tighten them with the line wrench while holding the radiator fitting, using the torque value from the service information if you have it. For quick connects, push the line in until it seats, reinstall the clip, and tug firmly on the line to confirm it is locked.
Check the transmission fluid level using the manufacturer's procedure. Some vehicles have a dipstick. Others have none and require checking the level through a fill or check plug at a specific fluid temperature. Top up with the specified fluid, run the engine and look for drips at both fittings. Recheck after a short drive once everything is warm, and again after it cools.
Limitations and When to Get Help
Fitting designs, tool sizes, torque values and fluid-check procedures differ by make, model and transmission. When you need specifics, use the service information for your exact vehicle. Stop before causing more damage if a fitting won't release with the correct tool, the radiator fitting starts to turn, or the tank cracks. A twisted line or broken radiator neck usually means replacing parts.
Get professional help if you see signs of cross-contamination, such as milky or foamy transmission fluid or oily residue in the coolant. These point to an internal cooler leak, which can harm both the transmission and the cooling system and needs proper diagnosis. A shop is also the better choice if your vehicle needs a scan tool or a temperature-controlled procedure to set the transmission fluid level correctly.