How to Clean a Transmission Valve Body
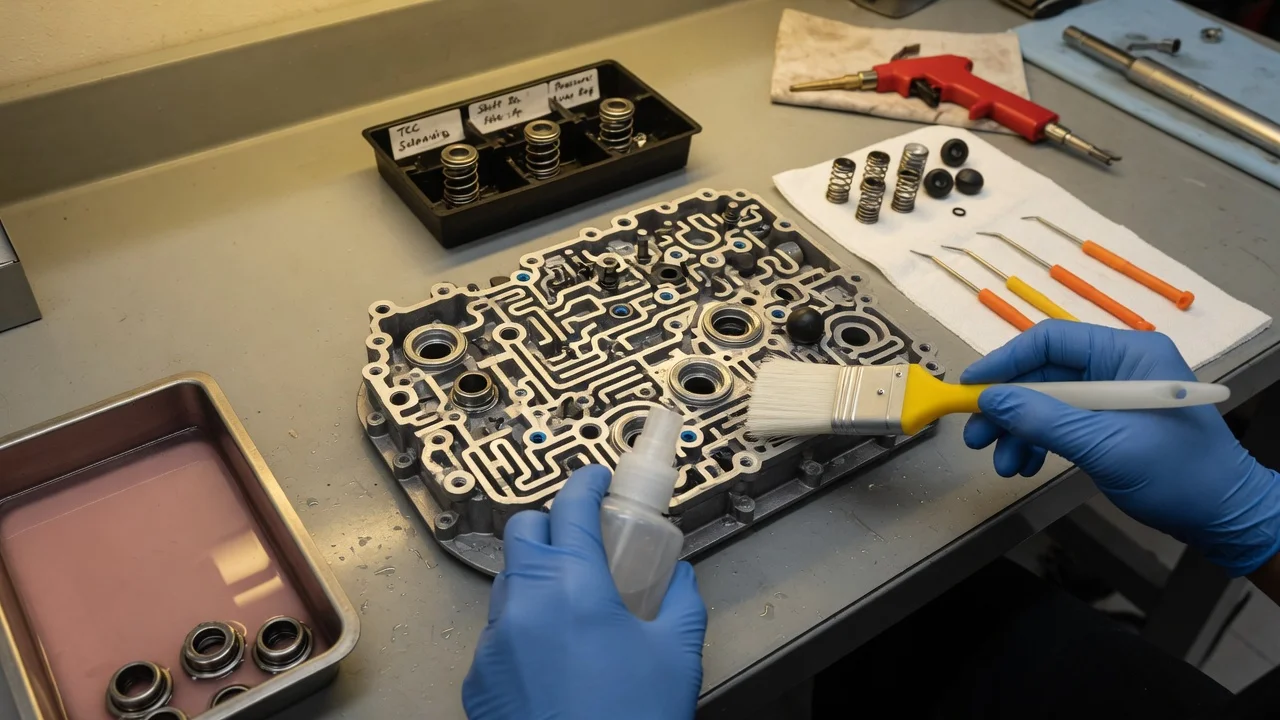
A transmission valve body routes pressurized fluid to the clutches, bands and solenoids that make each shift happen. Varnish, wear debris and clutch material can make its valves stick, which may show up as harsh, slipping or delayed shifts. Cleaning it is precise work, and the right approach depends on the exact transmission. Start by confirming what you have and whether cleaning is likely to help.
Decide When Valve Body Service Is Needed
Most manufacturers do not list valve body cleaning as a scheduled maintenance item. Their schedules usually cover fluid and filter service, often with a shorter interval for severe use such as towing, frequent short trips, stop-and-go traffic, hot climates or mountain driving. Following that fluid schedule is the main way to keep a valve body clean. Opening the valve body itself is normally a condition-based repair, not routine maintenance.
Reasons to consider it include erratic shift behavior, harsh engagement, flare between gears, delayed engagement into drive or reverse, and stored diagnostic codes pointing to pressure control, solenoid performance or gear ratio errors. None of these symptoms proves the valve body is at fault. Low or degraded fluid, worn clutches, a failing solenoid, wiring faults or a software issue can produce the same complaints. Check the fluid level and condition, read codes with a capable scan tool and review the service history first. If the fluid contains heavy metal particles or friction material, cleaning the valve body alone is unlikely to fix the underlying wear, and a fuller diagnosis or overhaul is the better repair option.
Identify the Transmission and Correct Materials
Confirm the transmission type and exact model from the vehicle's identification label, build data or the code stamped on the case. Conventional automatics, continuously variable transmissions and dual-clutch units differ widely. Some valve bodies can be disassembled bore by bore, while others, especially mechatronic units with an integrated control module, are serviced only as a complete assembly and may need programming after replacement. Service information for your exact version tells you whether disassembly is supported and lists the bolt torque values and tightening sequence. Do not guess those numbers.
Use only fluid that meets the fluid specification for your transmission; the wrong fluid can change friction characteristics and shift quality. Plan for a new pan gasket or sealant, a new filter, and any valve body gaskets, seals or O-rings that fitment data shows as single use. Useful tools include a torque wrench, a drain pan, a clean tray with compartments, a nonmetallic pick, a lint-free cloth, a phone for photos, and a cleaning solvent that will not harm the transmission's seals and plastic parts. A scan tool that can read transmission data and run relearn functions is often needed at the end.
Prepare the Vehicle and Workspace Safely
Let the transmission cool before draining, because hot fluid can cause burns. Park on level, solid ground, chock the wheels and support the vehicle on rated jack stands rather than a jack alone. Disconnect the negative battery cable before unplugging solenoid or module connectors unless the service information says otherwise. Wear eye protection and chemical-resistant gloves, particularly when using solvent and compressed air.
Cleanliness matters as much as safety. Valve bores have tight clearances, so a single fiber from a shop rag can cause a sticking valve. Clear a bench, cover it with clean paper and keep solvent, parts and fluid away from dust. Collect used fluid and solvent in sealed containers and take them to an authorized recycling or hazardous waste collection point; never pour them onto the ground or into drains.
Remove the Valve Body
Drain the fluid, remove the pan and inspect the debris in it and on the magnet before cleaning anything away, since it is useful diagnostic evidence. Remove the filter. Depending on the design, the valve body may sit under the pan, behind a side cover, or require removal of the transmission. Photograph the wiring, connectors and any manual valve linkage or detent spring before disconnecting them.
Valve body bolts are often different lengths, so note or mark each location as it comes out. Lower the valve body carefully and keep it level. Many units have check balls that can fall out when the assembly or separator plate is lifted, so photograph their positions before going further.
Clean the Valve Body Components
Work on one bore at a time and lay each valve, spring and retainer out in order in a clean tray. Retainers are often under spring pressure, so hold them in place while releasing them. Never mix parts between bores; springs that look alike may have different rates, and valves fit only one bore and in only one direction. If the service information does not support disassembly for your unit, limit cleaning to the exterior, passages and screens, or consider a replacement assembly.
Clean each part and passage with compatible solvent, then dry it with low-pressure compressed air while wearing eye protection. Avoid abrasives, files or wire brushes on valves and bores, because removing material changes clearances and can create leaks that affect pressure. Inspect for scoring, burrs, cracks, broken springs and worn bores. Lubricate each valve with fresh fluid and confirm it slides freely in its bore without binding. A valve that still sticks after cleaning points to wear or damage that cleaning cannot fix.
Clean the separator plate, inspect any screens and filters built into the valve body, and replace gaskets and seals rather than reusing them. Check the solenoids and their connectors for damage or contamination, but do not assume a solenoid is good or bad from appearance alone; electrical testing or scan tool data gives a clearer picture.
Reinstall and Refill
Reinstall check balls, the separator plate and gaskets exactly as photographed. Align the manual valve with its linkage, start every bolt by hand in its original location, and tighten them to the specified torque in the specified sequence. Reconnect the wiring, fit the new filter and install the pan with a new gasket or the approved sealant.
Refill with the correct fluid, then check the level using the method for your transmission. Many modern units have no dipstick and use a fill or check plug, and the level must be checked within a specific fluid temperature range, usually read on a scan tool with the engine running. Capacity varies with the transmission and with how much fluid stayed in the torque converter and cooler lines, so trust the level check rather than a fixed quantity.
Verify and Record the Result
Reconnect the battery and clear codes. Many electronically controlled transmissions need an adaptive reset or relearn procedure after valve body work, and some require a specific drive cycle; skipping it can leave shifts harsh or inconsistent. Check for leaks at the pan and connectors, recheck the fluid level at temperature, then road test through all gears and ranges, including light and firmer acceleration. Watch scan data for slip or pressure-related faults. If codes return or the original shift behavior persists, return to diagnosis instead of assuming the cleaning failed or that a particular part is now confirmed bad.
Record the date, mileage, transmission identification, fluid specification and amount used, parts replaced, any debris observed in the pan, codes before and after, and whether a relearn was completed. This service history helps future diagnosis and shows whether the problem was resolved or is developing further.