How to Clean an ABS Tone Ring
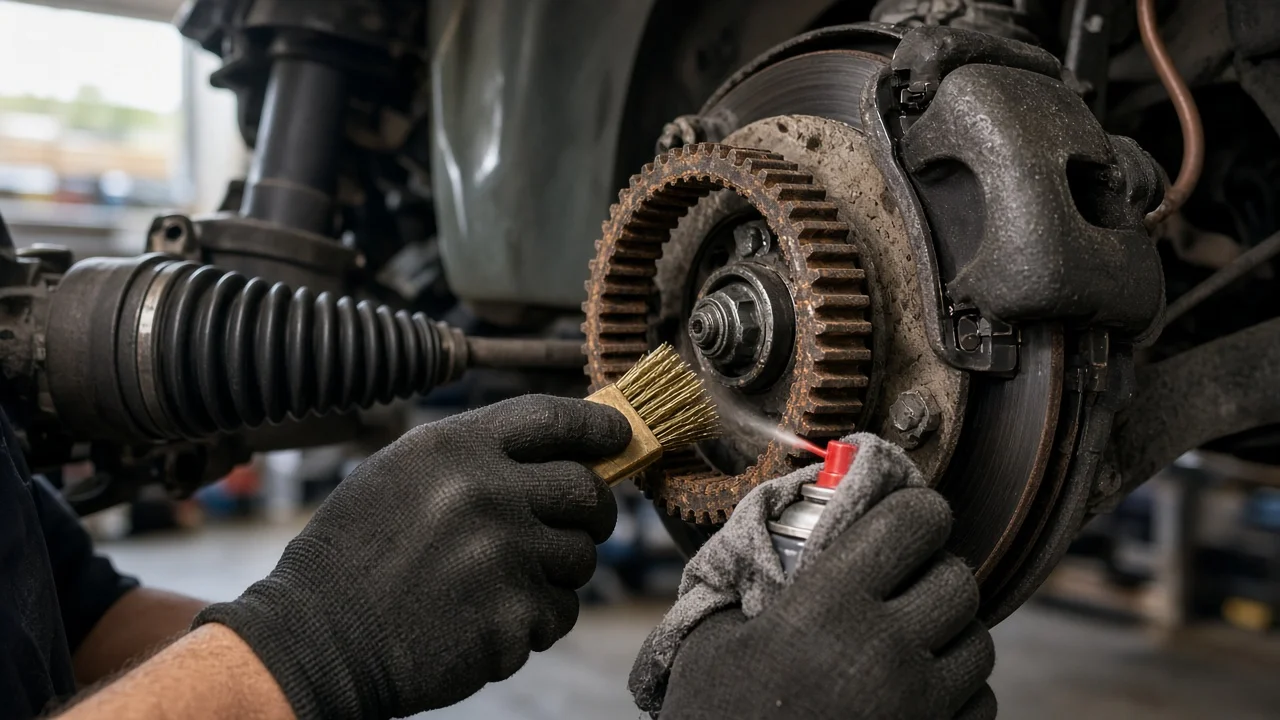
An ABS tone ring, also called a reluctor ring, gives each wheel speed sensor the pattern it reads to calculate wheel speed. When rust, road grime or metal debris builds up on the ring, the anti-lock, traction and stability systems can receive a distorted signal. Cleaning the ring is often a straightforward job, but you should confirm the likely cause first, use the right materials for your ring design and verify the repair afterward.
Understand what the tone ring does
Tone rings come in two broad designs. A toothed steel ring may be pressed onto the outer CV joint, the axle shaft or the hub, or cast into a brake rotor or drum on some vehicles. A magnetic encoder is a ring of alternating magnetic poles, usually built into the wheel bearing seal. It looks like a plain dark band rather than a row of teeth. The sensor detects changes as the ring rotates, and the control module compares the speeds of all wheels. Knowing which type is on your vehicle matters because the cleaning method differs. A toothed ring tolerates firm scrubbing, while an encoder is easily damaged by abrasives, sharp tools and magnets.
Decide when service is needed
Most manufacturer maintenance schedules do not list tone ring cleaning as a separate interval item, so check your owner's manual or service information rather than assuming an interval exists. In practice, condition drives this job. Vehicles driven on salted winter roads, in coastal climates, off-road through mud or through water crossings collect more corrosion and debris. For these severe-use vehicles, inspect the ring whenever the wheel is off for other brake work, such as replacing brake pads or brake rotors.
Common reasons to look at the ring include: • an illuminated ABS, traction control or stability warning light; • stored wheel speed sensor codes; • ABS activation or pedal pulsing at low speed on dry pavement; • erratic speed readings for one wheel in scan tool live data; A failed sensor, damaged wiring, a worn wheel bearing or a cracked ring can cause the same symptoms, so cleaning is one step in diagnosis rather than a guaranteed fix. If the red brake warning light is on, the pedal feels low or the vehicle pulls under braking, stop driving it and have the brakes inspected by a professional.
Identify the correct materials
Start by confirming vehicle fitment: year, model, drivetrain and axle. Front and rear rings, two-wheel and all-wheel drive versions, and parts from different bearing suppliers can use different ring designs. Service information for your exact vehicle will show: • where the ring sits; • how the sensor comes out; • whether the caliper, rotor or hub must be removed for access; • torque specifications for any fasteners you disturb
For consumables, gather a brake parts cleaner that is safe for the surrounding components, lint-free shop towels, a stiff nylon brush, and a plastic scraper or wooden stick for packed debris. A brass brush can help on a heavily rusted steel toothed ring. Never use wire brushes, abrasives or a magnet on a magnetic encoder. Useful tools include a jack, rated jack stands, wheel chocks, a torque wrench, a flashlight, an inspection mirror, and a scan tool that can read ABS codes and live wheel speed data. Inspection may reveal damage, so identify the correct replacement sensor, ring, hub or axle before you start. That way the vehicle is not left stranded on stands while you look for parts.
Prepare safely
Park on firm, level ground and chock the wheels that stay on the ground. Set the parking brake when working on the front. Lift only at the manufacturer's jacking points, and support the vehicle on jack stands before reaching under it. Let the brakes cool first, because rotors and calipers can be hot enough to burn skin after a drive. Turn the ignition off before unplugging any wheel speed sensor connector.
Brake dust and friction material residue should never be blown off with compressed air. Wet the area with cleaner or use a dedicated brake washer, wear eye protection and nitrile gloves, and work with good ventilation. Keep brake cleaner off painted surfaces, and avoid soaking rubber boots, bearing seals and wiring. If you remove the caliper, hang it from the suspension instead of letting it dangle by the brake hose, and do not press the brake pedal while the caliper is off. Collect used rags and spent cleaner in a closed container, and dispose of them under local rules for solvent-contaminated waste.
Carry out the service
Remove the wheel, then use your service information to locate the ring and the wheel speed sensor. On many vehicles the ring is visible through the sensor opening or behind the rotor. On others, the caliper, rotor or hub assembly has to come off first. Remove the sensor fastener and ease the sensor out by twisting it gently. Do not pry, because corroded sensors break easily. Check the sensor tip, which is often coated with metal particles or rust.
Inspect the ring before you clean it. Look for: • cracked, chipped or missing teeth; • a ring that has split or shifted on its mounting surface; • rust swelling underneath that has distorted the ring's shape; A damaged ring, a scored encoder or excessive wheel bearing play cannot be cleaned back into specification and must be replaced. If the ring is sound, rotate the hub by hand and clean the full circumference. On a toothed ring, spray cleaner, scrub between the teeth with the nylon or brass brush, and pick out packed mud with the plastic scraper. On a magnetic encoder, wipe the surface with a towel lightly dampened with cleaner, and remove clinging metal particles by hand instead of brushing hard.
Clean the sensor tip with a towel and cleaner. Then remove rust and scale from the sensor bore in the knuckle so the sensor seats fully, because buildup there can push the sensor away from the ring and widen the air gap. Most sensors have a fixed air gap and simply seat flush. A few designs are adjustable and must be set to the value in service information. To reinstall: 1) Insert the sensor without forcing it. 2) Tighten the fastener to the specified torque. 3) Route the wiring through its original clips, away from moving parts. 4) Reassemble any removed brake components following the service procedure.
Verify and record the result
Before driving, confirm that the wheel turns freely, the sensor connector is latched, and any removed brake parts are correctly installed and torqued. If the caliper was removed, pump the brake pedal until it is firm before moving the vehicle. If the pedal stays low, stop and have the hydraulic system inspected. Any repair that opens the hydraulic circuit also requires bleeding with the brake fluid specified for your vehicle. Next, clear stored ABS codes with the scan tool and watch live wheel speed data during a slow test drive. When driving straight, all wheels should show closely matched speeds.
The problem is not solved if the ABS or traction light returns, a speed reading drops out or spikes, a new grinding or humming noise appears, or ABS activates on dry pavement. In those cases the likely cause is a sensor, wiring, bearing or ring fault, and professional diagnosis is the next step. For your maintenance record, note the date, mileage, codes found, which wheel was serviced, the ring and sensor condition, any parts replaced and the torque values used. While the wheel is off, also record brake pad thickness and rotor condition against their wear limits, which makes the record useful at the next brake service.