Honda CR-V Engine Air Filter Replacement Guide
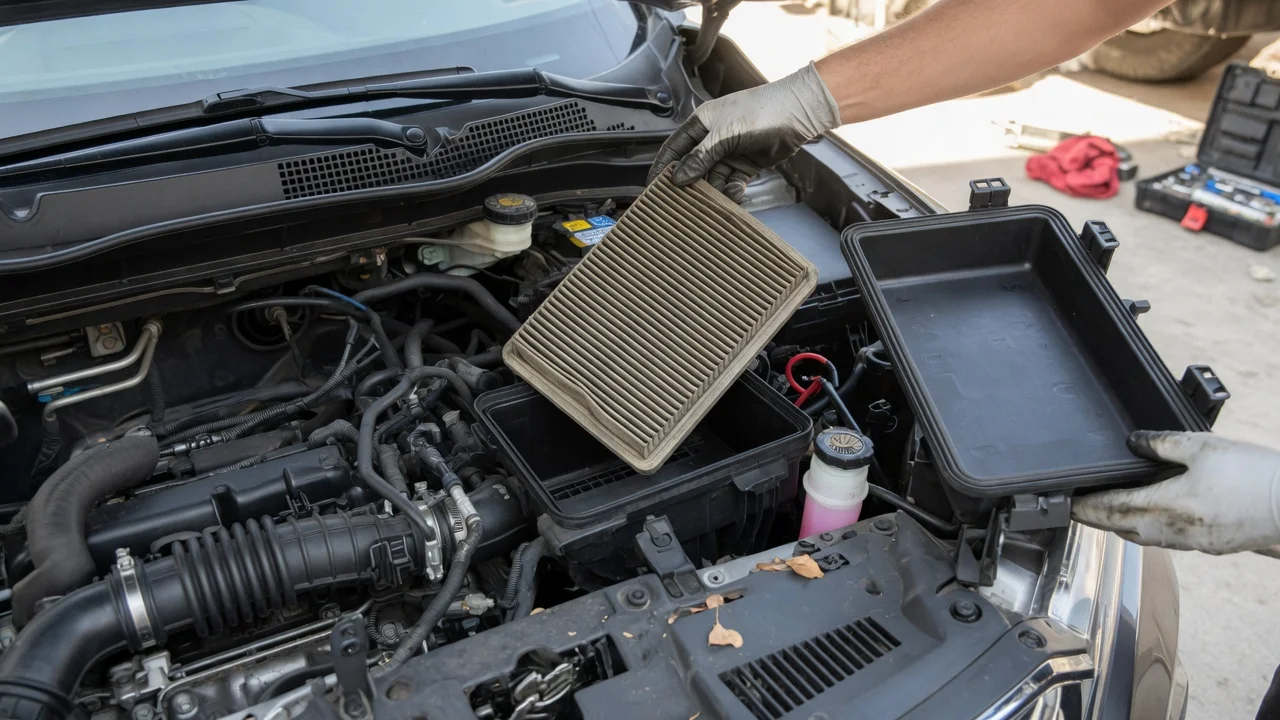
The essential answer
Replacing a Honda CR-V engine air filter is a routine engine-bay job: open the air-box lid, lift out the old paper or panel filter, seat a new filter of the correct size, and close the box so the lid seals. The engine air filter is the panel inside the plastic intake housing that traps dust and debris before air reaches the throttle body and engine. It is separate from the cabin air filter, which cleans air entering the passenger compartment through the HVAC system.
The exact housing layout, lid fasteners, filter shape, and service interval depend on model year, market, and engine. Confirm the part and procedure for your CR-V in the owner’s manual or by matching the old filter’s size and Honda part number before you buy a replacement.
What the engine air filter does
The engine draws a large volume of outside air to mix with fuel. The filter sits in the air box, usually on the inner fender or near the inner wing on the intake side of the engine bay. A clean filter lets the engine breathe with little restriction. A clogged filter reduces airflow, which can dull throttle response, lower fuel economy, and, in dusty conditions, let unfiltered air past a warped or poorly seated element.
Most CR-V engines use a dry rectangular or trapezoidal paper-element panel. Some later hybrids and gasoline models keep the same basic panel-in-box layout even when the intake plumbing around the box changes. A reusable oiled-gauze aftermarket filter is an option on some boxes, but it must still fit the housing and seal at the lid. Honda’s standard service item is a disposable paper filter.
When to replace it
Honda publishes inspection and replacement intervals in the maintenance schedule for each model year and region. Those intervals are not the same across the CR-V’s generations, and severe-service schedules (dust, dirt roads, stop-and-go, short trips) call for earlier changes than the normal schedule. Treat any single mileage figure as a guess unless it matches your year and market’s manual.
Inspect the filter rather than waiting for a warning light. The CR-V does not typically illuminate a dedicated engine-air-filter lamp. Pull the element and hold it up to light: if little light passes through the pleats, if the paper is packed with dirt, leaves, or insects, or if the gasket is crushed or torn, replace it. A filter that looks only lightly dusty can often stay in service until the next inspection. Do not tap or blow compressed air through a paper element as a substitute for replacement; that can tear the media or drive grit deeper into the pleats.
Replace sooner if you drive on unpaved or dusty roads, in wildfire smoke, or in heavy pollen or construction dust. Replace if the element is wet with oil or water, collapsed, or no longer seals against the box. Replace if you recently had intake or air-box work and the filter was left out, damaged, or installed backward. Inspect at every oil service if the vehicle sees mixed or unknown conditions.
What you need
Most CR-V air boxes open with metal spring clips, plastic over-center latches, or a few small screws. A screwdriver or socket that matches those screws is often the only tool. Wear gloves if the box is dirty. Have a vacuum or a damp cloth ready to clean loose debris from the empty housing so it does not fall into the clean-air duct.
Buy a filter listed for your year, engine, and market. Filter length, width, thickness, and the molded gasket outline change between generations. A filter that is even slightly undersize will leak unfiltered air around the edge. OEM Honda filters and quality aftermarket equivalents are both used for this job; match dimensions and the sealing frame, not only a generic “CR-V” label.
How to replace the filter
Park on level ground, shut the engine off, and open the hood. Locate the black plastic air box. On many CR-Vs it sits toward the inner fender, with a large intake snorkel feeding one end and a flexible duct leaving the other toward the engine. Do not confuse it with the cabin-filter housing under the glove box or cowl.
Release the air-box lid: unclip the latches or remove the lid screws. Some lids stay hinged on one side; others lift off completely. Do not force the lid if a hidden clip or hose is still attached. Lift the lid just enough to see the filter. Note which way the old element faces: the pleats usually stand vertically, and the rubber sealing edge sits in a groove in the box. Some filters are marked with an airflow arrow or “up” printing. Lift the old filter straight out. Avoid dumping dirt into the clean side of the box (the duct that runs toward the engine). Wipe or vacuum dust, leaves, and sand from the dirty side of the housing. If debris has already fallen into the clean duct, remove it before the new filter goes in. Do not spray solvent into the mass-airflow sensor if your engine uses one in or near the lid. Set the new filter in the same orientation as the old one. The sealing gasket must sit flat in the groove all the way around, with no folded corners. Refit the lid evenly and fasten every clip or screw. A lid that is latched on one side only will leak dusty air and can rattle. Start the engine and listen for a whistle or hiss at the box. A poor seal often shows up as intake noise rather than a stored fault on the first start.
On some later CR-Vs the air-box lid also holds a mass-airflow or intake-air-temperature sensor. Disconnect that connector only if the lid cannot open without it, and reconnect it before you start the engine. Do not touch the sensor element.
What changes by generation
Clip style, box shape, and whether the lid is screw-on or latch-on change across CR-V generations. First- and second-generation boxes are generally simple clip-lid housings. Later gasoline and hybrid models keep a panel filter but may nest the box more tightly against the battery, fuse box, or hybrid components, so lid access can be tighter even though the filter swap itself is the same idea.
Hybrid CR-Vs still use a combustion-engine air filter for the gasoline engine. That filter is not the same part as a high-voltage battery cooling filter, if the vehicle has one. Use the engine air-box element specified for the hybrid powertrain of that year.
Right-hand-drive and left-hand-drive layouts can move the box from one inner fender to the other. Turbocharged engines, where fitted in some markets, may use a different element and a more compact box. If your CR-V’s housing does not match a generic description, follow the lid fasteners and the filter outline in front of you rather than a procedure written for another year.
After the job
A correctly installed new filter should not change idle quality on its own. Rough running, a check-engine lamp, or a whistle after the swap usually points to a lid left unlatched, a sensor unplugged, or an intake hose left loose—not to the new paper itself. Reopen the box and confirm the gasket is seated and every clip is caught.
Dispose of the old paper filter with household waste unless local rules say otherwise. Do not wash and reuse a paper element. If you use a washable aftermarket filter, follow that maker’s cleaning and re-oiling instructions and keep oil off any mass-airflow sensor.
Limits of this guidance
This guide does not list Honda part numbers, torque figures, or a single replacement mileage, because those values are year-, market-, and engine-specific and were not verified here against a particular owner’s manual. Cabin-filter replacement, throttle-body cleaning, and intake-hose repair are separate jobs. If the air box is cracked, if the intake tube will not seal, or if a stored fault points to the mass-airflow sensor or intake system after a careful reassembly, have the intake side inspected rather than repeating filter swaps.