Fox Body Mustang Adjustable Control Arms: Fitment and Selection
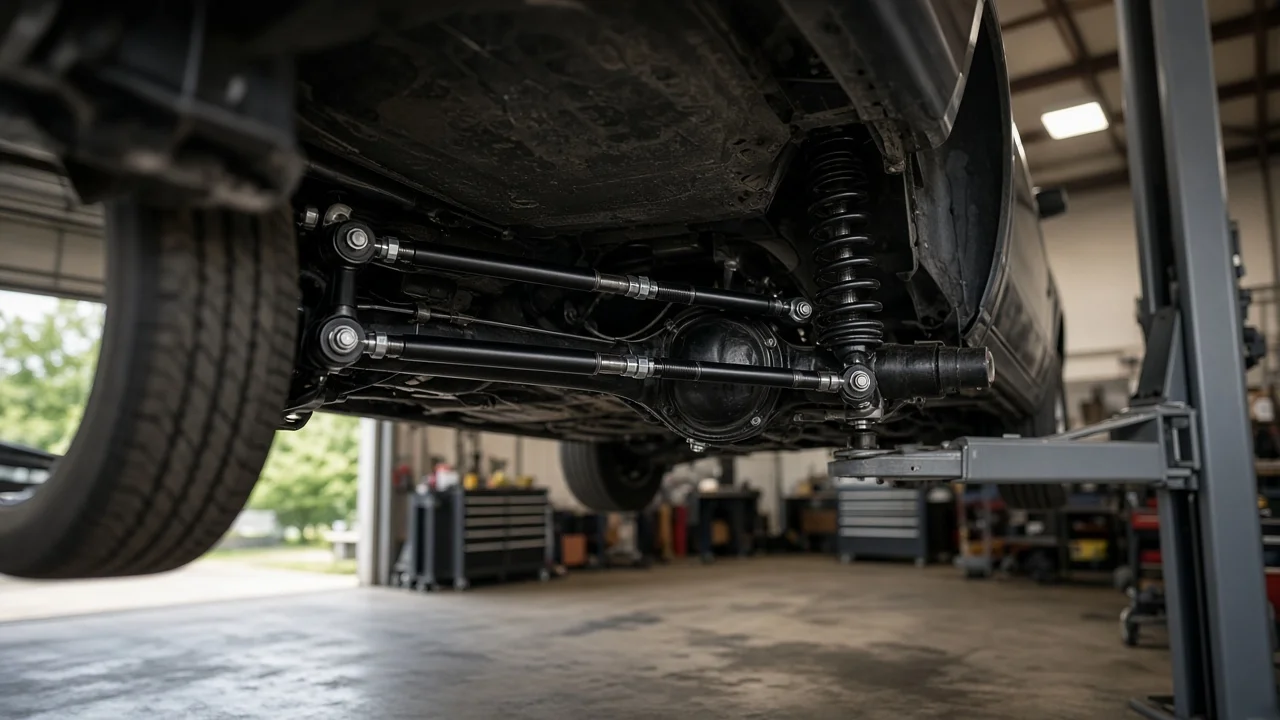
Adjustable control arms are among the most common suspension upgrades for the 1979–1993 Fox Body Mustang, especially at the rear. The factory four-link layout uses soft rubber bushings and fixed arm lengths. The right set lets you correct pinion angle, square the axle and reduce wheel hop. The wrong set can add noise, bind or fitment problems. This guide explains how to match arms to your car and goals, which features matter, and what ownership looks like after installation.
Define the job the product must do
On a Fox Body Mustang, adjustable control arms usually means the rear suspension. The rear axle is located by a four-link layout. Two lower arms carry the coil springs. Two shorter upper arms angle inward toward the differential housing. The uppers control pinion angle and help locate the axle side to side. The lowers control fore-aft position and carry most of the drive force. Adjustable upper arms let you reset pinion angle after changes to ride height, engine or transmission mounts, or the driveshaft. Adjustable lower arms let you square the axle in the chassis and fine-tune the wheelbase on each side. Some lower arms also add a threaded spring perch for ride height adjustment.
Before shopping, decide what the car actually does. A daily-driven street car needs low noise and durability. A drag car needs consistent launches and controlled axle wrap. An autocross or road course build needs predictable motion through the suspension travel without bind. Also note your constraints: how much harshness you will accept, whether the car is lowered, which springs, shocks or coilovers it runs, and whether you can measure pinion angle and get a wheel alignment afterward. Front lower control arms are a separate decision. On most Fox setups, camber and caster are adjusted at the strut top with caster/camber plates, not by changing arm length.
Check compatibility
Start with the year range. Most rear arms are sold for the 1979–1993 Mustang, and many listings also cover later models with a similar rear layout. Confirm the exact application on the manufacturer's fitment listing rather than assuming parts interchange. Then check each interface the arm must match. These include bushing size and sleeve width at the frame and axle mounts, bolt diameter, and the shape and diameter of the lower arm spring pocket compared with your springs. Check whether the lower arms have a mount for the factory rear sway bar if your car uses one. Wider wheels and tires can sit close to boxed or tubular lower arms, so check clearance if you run more than stock sizes.
Inspect the mounting points before buying. On older Fox chassis, the lower arm frame mounts in the torque boxes and the upper arm brackets on the axle housing are known to crack or tear. This is more common on cars with more power and sticky tires. New arms bolted into damaged mounts will not work as intended, so repair or reinforce those areas first. Confirm that any reinforcement kit works with the arms you choose. If the car has an aftermarket K-member, a coilover conversion, a five-lug conversion or later-model front parts, confirm that any front lower arms are listed for that exact combination. That includes the ball joint, the spring or coilover mount, and steering clearance.
Features that affect the choice
The end joints matter more than the tube. Rubber bushings are quiet and forgiving but flex under load. Polyurethane is firmer and more precise. However, the angled Fox four-link moves the axle through an arc that stiff bushings resist, which can cause bind as the suspension moves. Spherical rod ends and some proprietary pivot designs remove that bind and locate the axle most precisely. The cost is more noise and vibration in the cabin and more frequent inspection. Many street builds combine the two, with a compliant bushing at one end and a pivoting joint at the other. Check how each design handles rotation and articulation.
Next, look at how adjustment is done. Double-adjustable arms use left- and right-hand threads, so you can lengthen or shorten them on the car. That makes setting pinion angle and squaring the axle much easier. Single-adjustable arms usually require disconnecting one end. Check for solid jam nuts, clear guidance on minimum thread engagement, and whether replacement rod ends or bushings are sold separately. Tube material, wall thickness, weld quality and finish are worth comparing. Labels such as race-proven or ultimate strength are marketing. Useful evidence is a documented material specification, clear installation instructions and available service parts.
Lower arms with an adjustable spring perch change ride height and allow corner weight adjustment, but they do not change spring rate. Lowering the car this way still changes geometry, pinion angle and alignment, so plan to recheck all three.
Limitations and ownership costs
Installation requires proper vehicle support. Put the car on a lift or on rated jack stands at solid chassis points, and support the rear axle separately with a jack. The lower arms hold the coil springs under load, so remove and lower them in a controlled way. Use a spring compressor where the procedure calls for one. Work on one side at a time so the axle stays located. Tighten bushings with the suspension at normal ride height to avoid preloading them. Use the fastener specification from the arm manufacturer or the factory service information, and do not guess torque values.
Budget for setup beyond the parts. To set pinion angle, measure the driveshaft and pinion with an angle finder. Use the target your driveline or arm supplier recommends for your combination. Changing lower arm length moves the axle, so get a wheel alignment that checks rear thrust angle afterward. Any front suspension work needs a full alignment. You may also need new hardware, reinforcement brackets, or springs that suit a new perch.
Ongoing maintenance depends on joint type. Check rod ends and spherical pivots regularly and after hard use for joint play, torn boots and loose jam nuts. Polyurethane may squeak without the correct grease. Adjustable arms cannot fix worn shocks, sagging springs, damaged mounts or poor tires, and they do not adjust front camber. If wheel hop or vague handling continues after installation, inspect those parts instead of repeatedly changing arm length.
Build a practical shortlist
Narrow the field by asking the same questions about every candidate. Is the set listed for your model year and for any mounting changes on your car? Does it fit your springs or coilovers, your sway bar, and your wheel and tire package? Does the joint type match the noise you can tolerate and how often you will inspect it? Can the arms be adjusted on the car? Do they come with clear instructions and fastener information? Are replacement bushings or rod ends sold separately?
Compare two or three candidates side by side using those answers. Add the cost of everything the job requires: hardware, an angle finder, an alignment, and any mount repair or reinforcement. Choose the set that fits your use with the fewest compromises, not the one with the loudest marketing. For a mostly street-driven car, favor quieter joints and simple adjustment. For a car that regularly sees the track or strip, accept more maintenance in exchange for precise, bind-free axle location.