Drum-in-Hat Parking Brakes: Understanding the Mechanism
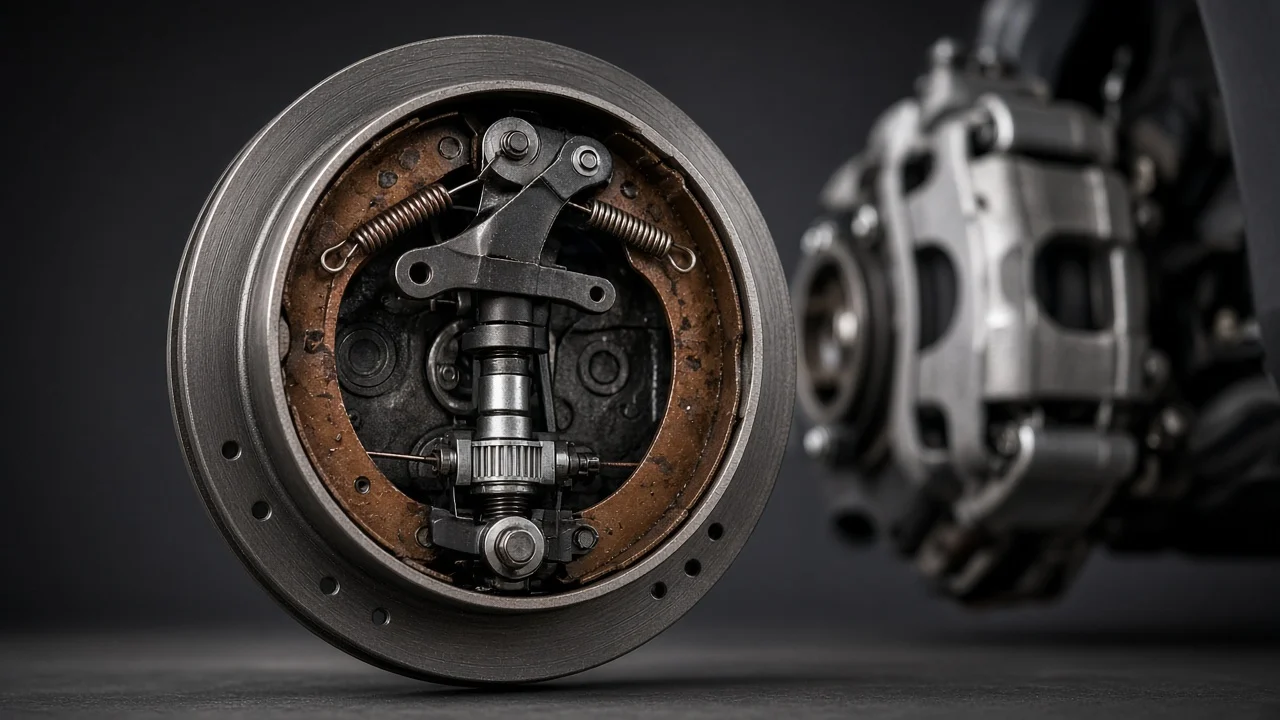
Many vehicles with rear disc brakes still use small brake shoes to hold the car when it is parked. This arrangement is called a drum-in-hat parking brake, and it hides a miniature drum brake inside the center section of the rear rotor. Knowing how it works explains why it can lose holding power, why it is often overlooked during routine brake jobs, and which checks are reasonable for an owner before handing the job to a technician.
What a drum-in-hat parking brake is
A drum-in-hat parking brake is a separate mechanical brake built into a rear disc brake assembly. The rear rotor has a raised center section, called the hat, that mounts to the hub. The inside of that hat is machined into a smooth cylindrical surface that works as a small brake drum. A pair of parking brake shoes mounted on the backing plate sits inside it. When you set the parking brake, the shoes expand against the drum surface and hold the wheel. The caliper and brake pads on the outer rotor faces handle normal stopping, while the shoes inside the hat are meant to hold a stationary vehicle. The two systems share one rotor but use different friction surfaces and different actuation.
This layout lets the rear caliper stay relatively simple and gives a strong mechanical hold that does not depend on hydraulic pressure. It appears on many trucks, SUVs and cars with rear discs, but plenty of vehicles instead use a caliper with a built-in parking mechanism or an electronic parking brake. Whether your vehicle has drum-in-hat shoes depends on its exact model, year and brake package, so confirm vehicle fitment before buying parts.
How the mechanism works
Pulling the lever or pressing the parking brake pedal tensions a cable that runs to each rear wheel. At the backing plate, the cable pulls an actuating lever that forces the shoes apart, usually through a strut between them. The shoes bear against an anchor point and press their friction material onto the inner drum surface of the rotor hat. Return springs pull the shoes back when the cable is released, and hold-down springs keep them positioned against the backing plate.
Most designs include an adjuster, typically a threaded star wheel between the shoes. Turning it sets how close the shoes rest to the drum. Unlike many conventional rear drum service brakes, many drum-in-hat adjusters do not self-adjust, so clearance may have to be set by hand during service, either through an access hole in the rotor or backing plate or with the rotor removed. The system is mechanical: brake fluid does not act on the parking shoes, so a hydraulic leak does not directly disable them, although it remains a serious fault for the service brakes.
Because the shoes normally engage only when the vehicle is stopped, their linings wear slowly. The more common problems are corrosion on the drum surface, seized or stretched cables, sticky lever pivots, broken springs and incorrect adjustment. Driving with the parking brake partly applied, or using it to slow a moving vehicle, is what usually causes real lining wear or overheating.
What changes the answer for your vehicle
Several details change how the system behaves and how it should be serviced. Shoe layouts and hardware differ between manufacturers, so springs, struts and adjusters are not interchangeable across designs. Some electronic parking brake systems still use drum-in-hat shoes, with an electric actuator pulling the cables instead of a hand lever; these may require a scan tool or a specific service mode before work begins. Vehicles with a separate drum-in-hat brake also differ from those whose rear caliper contains a screw or motor-driven parking mechanism, where the disc pads themselves hold the car.
Operating conditions matter as well. Vehicles that sit for long periods, see salted roads or are rarely parked with the brake set tend to develop rust on the drum surface and stiff cables. A scored or out-of-round inner drum, or one worn beyond its specified maximum diameter, reduces holding force. Replacing brake rotors also means a new drum surface, so the shoes may need readjustment, and some manufacturers specify a burnishing procedure for new parking shoes while others do not.
What the owner can check
Start with simple observations. On a moderate slope, with your foot firmly on the service brake, set the parking brake, shift to neutral and gently ease off the brake pedal while staying ready to reapply it. If the vehicle creeps, the parking brake is not holding as it should. Also note lever or pedal travel: a clear increase compared with what you are used to suggests excess shoe clearance or cable stretch. A rear wheel that is much hotter than the other after a drive, a burning smell, or a parking brake warning light that stays on after release can point to a shoe or cable that does not fully return.
When the rear wheels and rotors come off during a brake job, with the vehicle safely supported and the other wheels chocked, the parking brake assemblies are easy to inspect. Check that springs are intact, the shoes have usable lining, the strut and adjuster move freely, and the drum surface inside the hat is smooth rather than heavily rusted or grooved. Compare lining thickness and drum diameter against the wear limits in the service information; the maximum drum diameter may also be marked on the rotor. If a shop replaces your pads and rotors, ask whether the parking brake shoes and hardware were inspected and adjusted rather than assuming they were.
Using the parking brake regularly helps keep the drum surface clean and the cables moving. If it fails to hold, use wheel chocks and do not rely on the transmission Park position alone on a slope until the brake is repaired.
Limitations and when to get professional help
Shoe layout, adjuster access, cable routing, adjustment specifications and break-in steps vary by manufacturer and model, so a general description cannot replace the procedure for your vehicle. Adjusting the cable before setting shoe clearance, for example, can leave the shoes dragging or the system unbalanced side to side. Electronic systems add the risk of damaging an actuator if required service steps are skipped.
Stop driving and have the brakes inspected if a rear wheel overheats, you hear grinding or scraping from inside the rotor, the brake pedal feels different, or a warning light indicates a brake fault. A broken spring or loose shoe can contact the rotating hat and damage parts quickly. A qualified brake technician with the correct service information can confirm the configuration, measure components against specifications and restore reliable holding.