Dodge Charger ABS Tone Ring: Fitment Guide
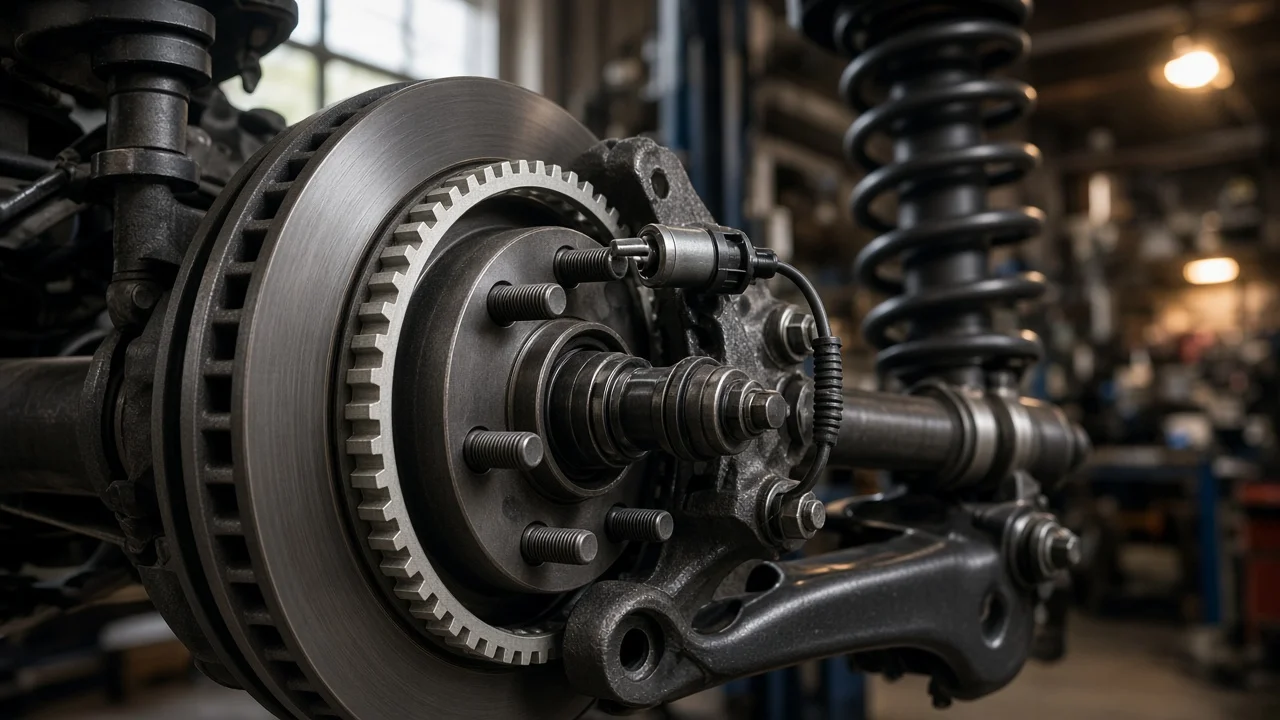
If your Charger is showing an ABS or traction control warning and a scan points to one wheel speed signal, a cracked or rust-swollen tone ring is a common suspect. Buying the right replacement depends on more than the model year. Axle position, drive type and how the ring is mounted all matter. This guide explains where the rings sit, what determines fitment and how to confirm the part before you install it.
Which Tone Ring Fits Your Charger
No single ABS tone ring fits every Dodge Charger. On the sedan built for the 2006 through 2023 model years, the part usually sold separately is the rear ring. It is a toothed steel band pressed onto the outer joint of each rear half shaft. At the front, the surface the sensor reads is normally built into the hub bearing assembly. A damaged front ring is therefore typically fixed by replacing the whole hub rather than a loose ring. The correct rear ring depends on drive type, trim and half shaft design. The 2024-on Charger uses an entirely different platform, so do not assume older listings carry over to it.
A correct part matches your car on three points. It has the same number of teeth. It has the same inner diameter, so it presses tightly onto the joint. It has the same width and seating position, so the teeth line up under the sensor. A listing that only says it fits a Charger, without confirming those details, is not enough to rely on.
How the Tone Ring Works With the ABS
Each wheel speed sensor sits a small distance from its tone ring. As the wheel turns, the teeth and gaps pass the sensor tip and create a pulsing signal. The ABS module converts that signal into wheel speed and compares all four corners. If one wheel slows much faster than the others under braking, the module reads it as an impending lockup. It then modulates hydraulic pressure to that caliper so the tire keeps rolling. Traction control and stability control use the same wheel speed data.
Because the module counts pulses, the ring has to be intact and run true. A crack lets the band spread or shift. Rust forming underneath can lift it off its seat. A broken or bent tooth leaves a gap in the signal. The module sees these defects as a wheel suddenly slowing or speeding up. The result can be a stored fault, warning lights, or ABS that clicks and pulses at low speed on dry pavement, where it should not activate at all.
What Changes the Correct Part
Several factors decide which ring your car needs: • Drive type: rear-wheel-drive and all-wheel-drive Chargers do not necessarily share rear half shafts. • Trim: high-output trims such as SRT models may use heavier shafts and joints. • Production changes: updates during the long production run can change part numbers within the same generation. For these reasons, a VIN-based lookup is more reliable than selecting year and model alone. A parts counter can confirm vehicle fitment against the original half shaft or hub part number.
Tooth count deserves special attention. The ABS module is set up to expect a specific number of pulses per wheel revolution. A ring with the wrong count can slide on and seat perfectly, yet still report an incorrect wheel speed and trigger faults. Also check whether the listing is side-specific, and whether the ring is meant for an original or a remanufactured shaft.
The condition of the parts underneath also affects the right choice. If the joint surface under the old ring is deeply pitted, a new ring may not stay tight. A torn axle boot points to a failing joint as well. In either case, replacing the complete half shaft, which usually arrives with a ring already installed, may be the better repair. Cars driven on salted winter roads are the most likely to have this kind of corrosion.
Confirming the Fault Before Buying
Start with a scan tool that can read ABS codes and show live wheel speed data. At a steady low speed, all four readings should track closely. A wheel that drops out, spikes or reads erratically points to that corner. Next, remove the wheel and inspect the ring with a flashlight while rotating the hub or shaft. Look for cracks, a gap in the band, missing teeth, or a ring that has moved along the joint. Check the sensor tip for metallic debris and the harness for chafing before blaming the ring. A sensor or wiring fault is often cheaper to fix.
If the ring is damaged, gather details from it before ordering. Count the teeth, and measure the inner diameter and width with calipers. Photograph how far the ring sits from the joint's edge. Compare these figures with the listing or the old part to avoid a second trip and a car left apart in the driveway.
Replacing a Rear Ring
Reaching the rear ring usually starts with removing the wheel, the brake caliper and the rotor. Often the half shaft must also be separated from the hub, or removed from the car entirely. Support the caliper with wire instead of letting it hang on the brake hose. If the hose stays connected, the hydraulic system is not opened and the brake fluid does not need bleeding. Follow the torque values and fastener replacement notes in the service information for your specific car.
To remove the old ring, cut or spread it carefully without nicking the joint housing. Clean the seating surface down to sound metal. Press the new ring on evenly with a driver that contacts its full circumference, stopping at the original depth. Some ring instructions call for gentle, even heating before installation. Hammering one side can distort the ring and create the very signal fault you are trying to fix. Once it is installed, spin the shaft and confirm the ring runs true with clear space between the teeth and the sensor.
While the corner is apart, measure the brake pads' remaining friction material and the brake rotors' thickness against the wear limits for your car. The rotor's minimum thickness is often stamped on the rotor itself. After reassembly, pump the brake pedal to reseat the pads before moving the car. Then clear the codes and confirm on a test drive that the warning lights stay off and all four wheel speeds match.
Limitations and When to Get Professional Help
This is a general fitment guide. Part numbers, procedures and specifications vary across the Charger's production years and trims, so confirm details with service information for your exact vehicle. Pressing a ring on correctly takes suitable tools and care. A shop may be the faster option if the half shaft is seized in the hub or the joint surface is corroded.
When only the ABS light is on, base braking normally still works, but anti-lock and stability functions may be unavailable. Drive with extra caution and repair the fault promptly. If the red brake warning light appears, the pedal feels soft or sinks, or you notice grinding or pulling, stop using the car and have it inspected by a brake professional. Also seek professional diagnosis if codes return after a correct ring is installed. The cause may then lie in the sensor, wiring or ABS module rather than the ring.