Chevy Cruze Wastegate Actuator Replacement
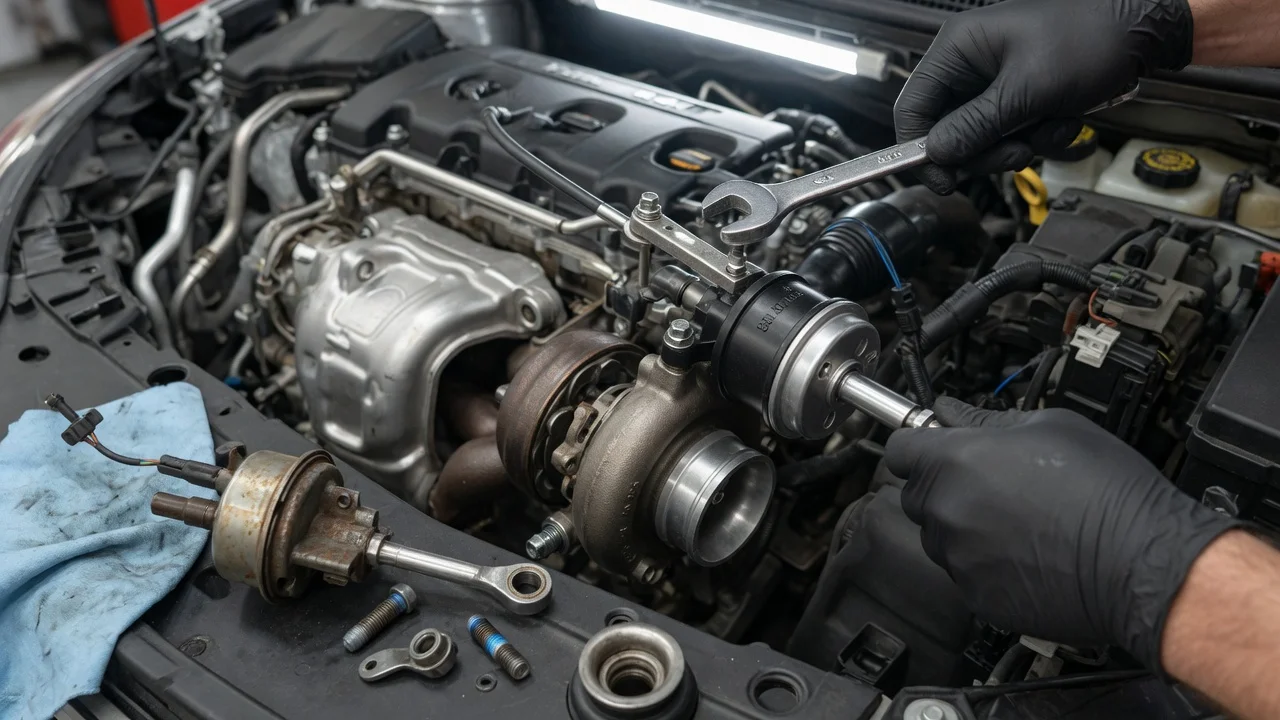
A failing wastegate actuator can leave a turbocharged Chevy Cruze short on power, set boost-related trouble codes or let the turbo overboost. Replacing it is a manageable job on some configurations and a turbocharger-level repair on others. This guide covers how to confirm that the actuator is really at fault, prepare for the work, remove and install the part without collateral damage, and check the result before you consider the repair finished.
Confirm the part and repair scope
Start with your exact vehicle configuration. The Cruze was built in two generations, and turbocharged gasoline engines as well as diesel versions were offered in different model years. Depending on the engine, the wastegate may be moved by a vacuum-operated actuator fed by a separate control solenoid, or by an electronically controlled actuator. Mounting, connections and parts availability differ between these designs. On some configurations the actuator is sold as a separate service part, while on others it is supplied only with the complete turbocharger. Use the VIN and the engine code from the Service Parts Identification label when ordering, and compare the new part's bracket, rod and port or connector with the original before starting work.
Next, make sure replacement will actually fix the problem. An underboost code such as P0299 or an overboost code such as P0234 can also come from cracked vacuum hoses, a faulty boost control solenoid, leaking charge air pipes or intercooler couplers, sensor faults or exhaust restriction. A metallic rattle from the turbo area is often caused by wear at the wastegate linkage or valve pivot rather than by the actuator itself, and a new actuator will not cure that. On a vacuum-type unit, apply vacuum with a hand pump: the rod should move smoothly and the diaphragm should hold vacuum. Use a scan tool to compare desired and actual boost, smoke-test the intake for leaks, and review the service history for earlier turbo work or related repairs.
Prepare tools and safe access
Obtain the factory service information for your specific engine before touching a wrench. It gives the correct removal sequence, the manufacturer specifications for fastener torque, any one-time-use parts and whether a learn or calibration procedure is required afterward. Typical tools include a socket and wrench set, a scan tool capable of reading live boost data, a hand vacuum pump for vacuum-operated designs, penetrating oil, a pick or small screwdriver for retaining clips, and jack stands if access is easier from below. Have new clips, hoses and any gaskets listed in the service procedure on hand, since heat-cycled parts near the turbo are often brittle or corroded.
Work only on a fully cooled engine; the turbocharger and exhaust stay hot long after shutdown. If the vehicle must be raised, support it on jack stands on level ground and never rely on a jack alone. Disconnect the battery when the service information calls for it or when working around electrical connectors. Be realistic about difficulty: if your actuator is serviced only with the turbocharger, the job involves oil and coolant lines, exhaust fasteners that often seize, and precise reassembly. That level of work is not suitable for an inexperienced owner and is better handled by a qualified technician.
Remove without avoidable damage
Exact steps vary by engine, but the removal generally follows the same pattern. Remove any covers, heat shields or air ducts that block access, following the order in the service procedure. Label and disconnect the vacuum hose or electrical connector from the actuator. Release the retaining clip that joins the actuator rod to the wastegate arm, then remove the fasteners holding the actuator bracket to the turbocharger housing and lift the unit out. Before removal, note how the rod sits on the arm and how the hose is routed, as a reference for reassembly.
The main risks are mechanical. Do not pry against or bend the wastegate arm, because its geometry affects how well the valve closes and therefore how boost is controlled. Retaining clips tend to spring off, so cover open intake or exhaust passages to keep small parts and debris out. Bracket fasteners near the turbo are frequently corroded: soak them in penetrating oil, use well-fitting sockets and apply steady force rather than impact. A fastener broken off in the turbo housing can turn a simple actuator swap into a much larger repair, so stop and reassess if one will not move.
Install and restore the system
Fit the new actuator in the same orientation as the original, with the port or connector facing the same way so hoses and wiring route without strain or contact with hot surfaces. Tighten the bracket fasteners to the torque values in the service information rather than guessing. Attach the rod to the wastegate arm with a new retaining clip and confirm the arm moves through its full travel without binding. For a vacuum-type unit, recheck operation with a hand pump before reconnecting the supply hose, verifying smooth rod movement and a steady vacuum hold.
Some replacement actuators have an adjustable rod. Set its length or preload exactly as the service procedure or the part supplier specifies; an incorrect setting can cause either underboost or overboost, and copying the old part's position is not a substitute for the instructions. Reconnect the vacuum hose to the correct port, replacing any cracked or hardened line, or plug in the electrical connector until it locks. Electronically controlled actuators may require a scan-tool learn or position calibration after installation, so confirm whether that step applies to your engine. Reinstall all heat shields and covers, since they protect nearby hoses and wiring.
Check the completed work
Before starting the engine, do a final inspection: every clip seated, hoses and connectors secure, shields in place and no tools left in the engine bay. Reconnect the battery if it was disconnected, record any stored codes and then clear them. Start the engine and listen for vacuum or exhaust leaks and unusual noise. On a road test, try to reproduce the operating conditions under which the original fault appeared. With a scan tool, watch desired versus actual boost and any wastegate control values available for your engine; actual boost should track the requested value without lagging badly or overshooting.
Further diagnosis is needed if the same code returns, boost remains low or spikes, the check engine light comes back, or a rattle persists, which points toward linkage or turbocharger wear. Blue smoke, oil around the turbo or a rising whine suggest internal turbo problems that an actuator cannot address. Recheck for codes after several drive cycles, record the repair in the service history, and include the turbo hoses and actuator linkage in future inspections as part of your regular maintenance schedule.