Chevy 3500 Rear Axle Bearing Replacement
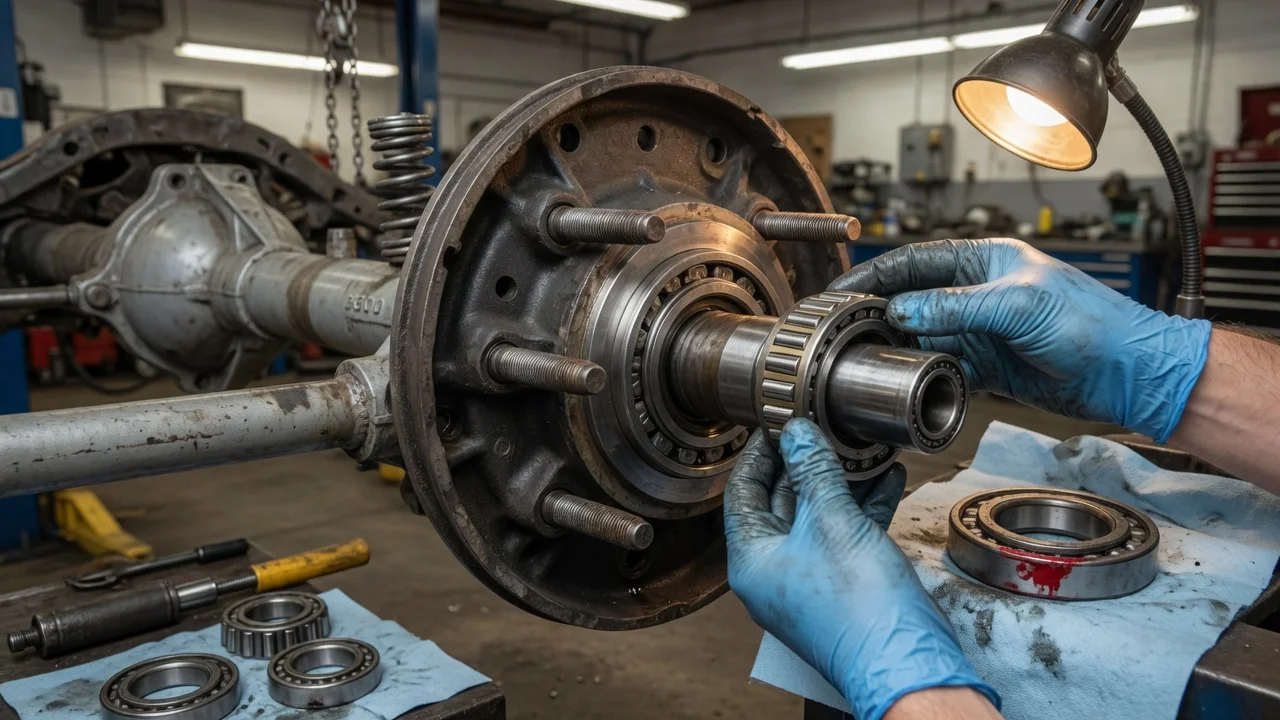
A worn rear wheel bearing on a Chevrolet 3500 usually shows up as a growl that rises with road speed. On a heavy-duty truck it needs prompt attention. Most 3500 trucks use a full-floating rear axle, which means the bearings sit in the hub rather than on the axle shaft. This guide covers confirming the diagnosis, preparing the truck, removing the hub, installing new bearings and checking the result. Take exact torque and adjustment values from the factory service information.
Confirm the part and repair scope
Start by pinning down the exact vehicle configuration. Chevrolet has fitted 3500 trucks with different rear axles across generations. Single- and dual-rear-wheel pickups, chassis cabs and vans can differ even within one model year. The Service Parts Identification label in the glove box lists RPO codes that describe the axle, and many housings also carry an identification tag or stamping. Order parts using the VIN and that information, not the model name alone. On a full-floating axle, a ring of bolts holds the axle shaft flange to the center of the hub, and the wheel studs sit in the hub itself. If the lug studs are pressed into the axle shaft flange instead, the truck has a semi-floating axle and needs a different procedure.
Next, confirm the bearing is really the problem. A failing hub bearing typically growls or rumbles with speed and may change tone as the load shifts in a turn. You may also feel roughness or free play at the wheel. Cupped tires, a worn pinion or carrier bearing, and brake hardware can sound similar, so inspect before buying parts. Raise the axle and spin each wheel by hand to feel for roughness. Then rock the tire at the top and bottom to check for play. Gear oil on the brake parts or inside the wheel points to a leaking hub seal, which is normally replaced along with the bearings. Check the service history as well, because a recent hub job or contaminated gear oil changes what you should expect to find. Many owners replace both bearings and the seal on the affected side. They often do both sides when mileage and operating conditions, such as regular towing, are similar.
Prepare tools and safe access
This is a heavy-component job. A dual-rear-wheel hub with its drum or rotor is heavy and awkward to handle. The work also requires removing and seating bearing races without damage and setting bearing adjustment accurately. If you have never adjusted tapered roller bearings or lack a safe lifting setup, have a shop do the job. Before you start, get the factory service manual or equivalent data for your model year. The adjustment procedure, nut and flange bolt torque, and gear oil type and capacity all vary by axle. Take them from the manufacturer specifications.
You will typically need a floor jack, jack stands rated for the truck, wheel chocks, a breaker bar and a torque wrench. You also need the correct hub nut socket for your axle, race and seal drivers, a brass drift, a drain pan, brake cleaner and clean towels. Buy the bearings, races and seal as a matched set for your axle. Also get a new axle flange gasket or the specified sealant, plus the correct gear oil. Park on level, solid ground and chock the front wheels. Break the lug nuts loose before lifting. Support the axle housing on stands, never on the jack alone.
Remove without avoidable damage
Remove the wheels, both of them on a dually. Place a drain pan under the hub, because gear oil will run out once the axle shaft comes out. Remove the axle flange bolts and pull the shaft straight out. If it sticks, a sharp tap at the center of the flange often frees it. Do not pry between the flange and hub, which can gouge the sealing surface. Cover the open axle tube to keep dirt out. On disc brake models, remove the caliper and bracket, and hang the caliper so the hose is not stretched. On drum models, back off the adjuster if the drum will not clear the shoes.
Depending on the axle, the bearings are held by a locking ring, key, tabbed washer, jam nut or a combination, followed by the adjusting nut. Note the order and orientation of every piece and photograph them. Plan to replace any parts the service information lists as single-use. With the nut off, slide the hub straight off the spindle while catching the outer bearing. Use a helper or a wheel dolly for the weight. Protect any ABS sensor and tone ring from impact. On the bench, remove the inner seal and bearing. Then drive the races out evenly with a brass drift, working around the circumference so the bore is not scored. Inspect the spindle and hub bore for scoring, wear or signs that a bearing has spun. Damage there means the repair goes beyond a bearing swap.
Install and restore the system
Clean the hub cavity and spindle thoroughly, removing old lubricant, sludge and metal debris. Drive the new races in squarely with a proper driver until they are fully seated. A race that is not bottomed will loosen and ruin the new bearing. Lubricate the bearings as the service information directs. Full-floating hubs are usually lubricated by axle gear oil from the tube, and the manual may call for prelubricating with gear oil or wheel bearing grease. Install the inner bearing. Then drive the new seal in flush and square, with its lip facing the direction the instructions show.
Slide the hub onto the spindle carefully so the threads do not cut the seal lip. Install the outer bearing and adjusting nut. Set the adjustment exactly as the factory procedure specifies. This may involve seating the bearings at one torque while rotating the hub, backing off and setting a final value, or measuring endplay with a dial indicator. Do not guess. Too tight overheats the bearings, and too loose allows play that wears out the bearings and the seal. Make sure the locking hardware fully engages. Fit the new gasket or sealant, then insert the axle shaft so its splines engage the differential side gear. Torque the flange bolts to specification. Reinstall the brake components and adjust drum brakes if applicable. Finally, fill the differential with the specified gear oil to the level the service information calls for.
Check the completed work
Before lowering the truck, spin the hub. It should turn smoothly without roughness or clicking, and rocking the tire should show no play beyond what the procedure allows. Pump the brake pedal to restore pedal height and confirm the parking brake works. Torque the lug nuts to specification in the correct sequence. Make sure any ABS sensor is connected and routed clear of moving parts.
Road test at low speed first, then at normal speed, and listen for the original noise. Afterward, carefully compare hub temperatures. One hub that is noticeably hotter than the other can mean the adjustment is too tight or a brake is dragging. Recheck the differential fluid level, since some oil moves into the hubs. Look for gear oil at the axle flange and inside the wheel. Continued noise, a warning light, excess heat, leaks or play mean the truck needs further diagnosis, not more driving, because the source may be the differential, tires or brakes. Record the work in the service history. If the truck tows or hauls regularly, add hub inspection to your maintenance schedule according to the manufacturer's guidance rather than an assumed universal interval.