6R140 Transmission Valve Body Replacement: Scope, Removal, Installation and Checks
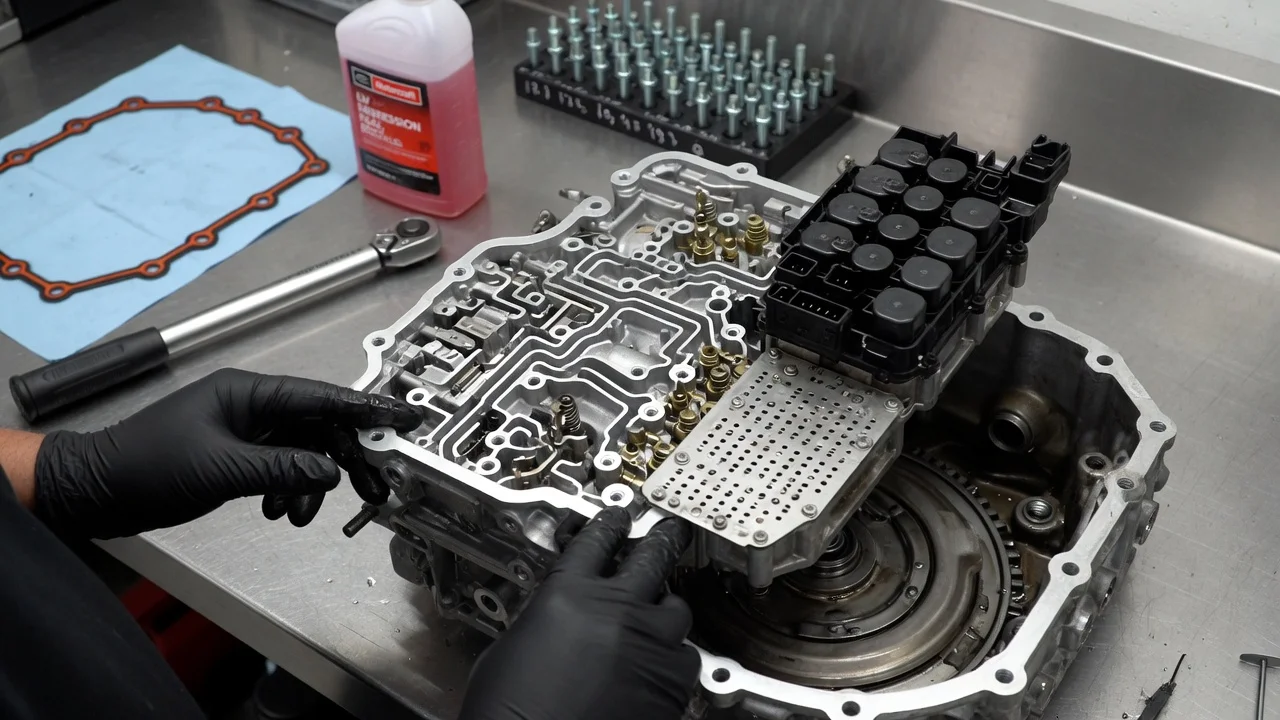
The 6R140 is the heavy-duty six-speed automatic used in many Ford Super Duty trucks. Its valve body routes pressurized fluid to the clutches that make each shift. Replacing it is an internal transmission repair, not routine maintenance, and it only makes sense when diagnosis points to the valve body. This guide covers confirming the repair scope, preparing for the job, removal, installation and verification. Exact procedures and specifications always come from the service information for your specific truck.
Confirm the part and repair scope
Start with fitment. Record the model year, engine, VIN and the identification tag on the transmission case, because valve body assemblies, solenoid packages and calibrations can differ between production periods and configurations. Before buying anything, confirm that the replacement unit matches your transmission type and build. Check what the part includes. Some assemblies arrive complete with solenoids and are ready to install, while others are bare castings that need your existing components transferred. Repair options generally include a new assembly, a remanufactured unit or a used part. A used valve body carries an unknown history, and it may still need programming before it works correctly.
Symptoms alone do not prove the valve body has failed. Harsh or delayed engagement, flared shifts, slipping, erratic shift behavior and stored diagnostic codes can also come from low or degraded fluid, wiring or connector faults, sensor problems, outdated software, worn clutch packs or torque converter issues. Read all stored and pending codes. Review live data for commanded versus actual gear and the fluid temperature reading. Check the fluid level and condition, and go through the service history for previous fluid changes, software updates and repairs. If the pan holds heavy friction material or metal debris, the transmission likely has mechanical wear that a new valve body will not cure.
Prepare tools and safe access
Get the factory or professional service procedure for your exact truck before starting. It supplies the bolt torque values, tightening sequence, fluid capacity, fill and level check method, and any programming steps. You will need: • a lift, or quality jack stands on firm, level ground; • a drain pan large enough for the fluid volume; • a new pan gasket and filter; • enough fluid that meets the specification listed for your transmission; • a torque wrench that reads accurately in the low range used for valve body bolts; • a scan tool able to read transmission data and perform any required programming or adaptive reset; • lint-free shop towels, a clean bench and trays to keep fasteners organized
This job is not a good fit for inexperienced owners. A Super Duty is heavy and must be supported securely. Transmission fluid can cause burns if the truck was recently driven. Contamination from dirt or lint can cause new shift problems. Programming may need dealer-level software. If you lack the support equipment, scan tool capability or a clean workspace, a transmission specialist is often the more economical choice.
Remove without avoidable damage
Let the fluid cool to a safe temperature. Disconnect the battery if the service procedure calls for it, then drain the fluid and remove the pan. Inspect the pan sediment and magnet before cleaning them, because that material is diagnostic evidence. Remove the filter. Then release the internal electrical connector at the case pass-through as instructed, without pulling on the wiring. Follow the service information to identify only the bolts that secure the valve body to the case. Do not loosen the bolts that hold the valve body sections together. Mounting bolts often vary in length, so mark or photograph each location as you remove them.
Support the valve body as the last bolts come out, since it is heavy and will release residual fluid. Lower it straight down so the manual valve disengages from the selector linkage without bending anything. Watch for loose check balls, springs, seals or separator plate components that the service procedure identifies, and note where each one sits. Never pry against sealing surfaces. Keep the opening covered while the unit is out so debris cannot enter the case.
Install and restore the system
Compare the old and new assemblies side by side to confirm the connector, the manual valve and the mounting points match. Transfer any components only as the service procedure or the part supplier directs. Raise the unit into position and engage the manual valve with the selector linkage in the orientation the procedure shows. Seat the electrical connector fully. Start every bolt by hand in its original location, then tighten in the specified sequence and stages to the published torque. Uneven or excessive torque can distort the valve body and cause valves to stick. Install the new filter and seal, then the pan with a new gasket.
Commissioning matters as much as the hardware. Depending on the configuration, a replacement valve body or solenoid assembly may need a calibration loaded or solenoid data entered with a scan tool. The learned adaptive values usually need to be reset afterward. Refill with fluid that meets the stated specification. Check the level using the documented method, at the specified fluid temperature, with the engine running. Pause briefly in each selector position before the final check, as the procedure describes.
Check the completed work
With the truck still supported, look for leaks at the pan gasket and connector. Clear the codes, then confirm that none return at idle or during gear selection. On a road test, watch live data for commanded versus actual gear, slip indications and fluid temperature. Check that engagements into drive and reverse feel prompt and smooth. Expect shift quality to refine over several drive cycles while the adaptive strategy relearns. Avoid towing or heavy loads until the shifts are consistent, then recheck the fluid level once more at operating temperature.
Further diagnosis is needed if the original symptom persists, if new gear ratio or solenoid codes appear, or if the fluid looks aerated or darkens quickly. The same applies if you see flaring, slipping or harsh shifts that do not improve after relearning. In those cases, look at clutch condition, torque converter operation, wiring integrity and software level rather than assuming the new part is defective. Keep records of the part number, programming performed and fluid used, both for your service history and for any warranty claim.