2013 Jeep Wrangler Parking Brake Shoe Replacement Guide
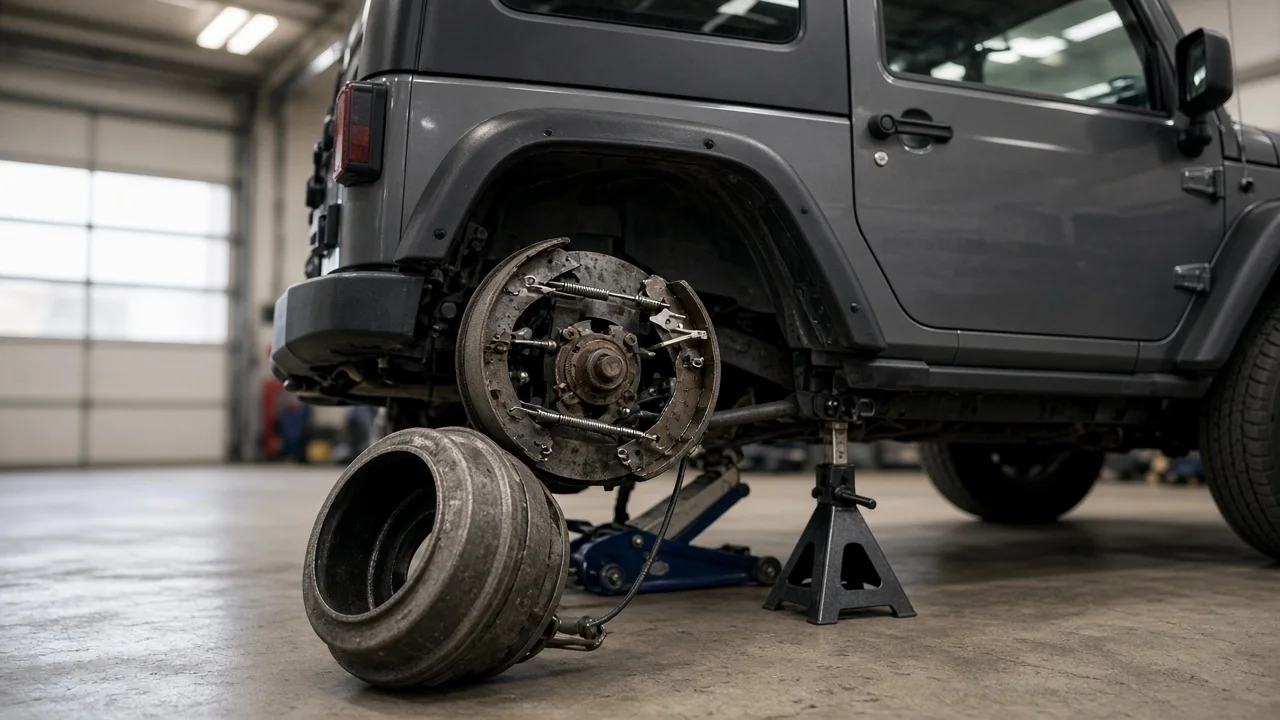
On a 2013 Jeep Wrangler, the parking brake does not use the rear brake pads. Each rear brake rotor has a small drum machined into its hat, and a pair of parking brake shoes inside that drum holds the vehicle when the lever is applied. When those shoes wear out, get contaminated or lose hardware, the parking brake stops holding reliably. This guide covers replacing the rear parking brake shoes only.
Confirm the part and repair scope
The 2013 model year belongs to the JK Wrangler generation, and both two-door and Unlimited versions use this drum-in-hat parking brake design at the rear axle. Still, confirm vehicle fitment by model year and VIN in the parts catalog before buying a shoe kit. Do not assume that parts listed for another generation, another axle or the service brakes will fit. Replacing the hold-down springs, return springs and adjuster hardware at the same time is common practice, because old springs can lose tension and adjusters often seize.
Make sure new shoes will actually fix the complaint. A parking brake that fails to hold on a grade, or a lever that travels too far, can also be caused by a stretched or seized cable, a seized adjuster, or a lever problem. Shoes soaked with gear oil point to a leaking axle seal; new shoes installed without fixing that leak will be contaminated again. Once the rotor is off, measure the remaining friction material against the wear limits in the service information and check the drum surface inside the rotor hat for scoring and maximum diameter. Noise, pulsation or a soft pedal during normal stops are service brake issues involving the pads, rotors, caliper or brake fluid, and they need separate diagnosis.
Prepare tools and safe access
Get the factory service information for your exact vehicle before starting, since it provides the torque values, adjustment method and any burnishing procedure. You will need a floor jack, rated jack stands, wheel chocks, a lug wrench, sockets, a torque wrench, drum brake spring and hold-down tools, brake cleaner, high-temperature brake grease, and ideally a brake shoe gauge to compare drum and shoe diameters. Wire or a hook to support the caliper is also useful.
Work on level ground, chock the front wheels and leave the transmission in park or in gear, because the rear parking brake will be disabled while you work. Support the axle on jack stands and never rely on the jack alone. Brake dust should not be blown off with compressed air; clean parts with brake cleaner and wipe them down. Drum brake hardware is spring-loaded and easy to install incorrectly. If you have never serviced drum brakes, consider having a professional do this job, because a mistake can leave the vehicle with no working parking brake.
Remove without avoidable damage
Loosen the lug nuts, raise the rear, support it securely and remove the wheel. Release the parking brake fully. If cable tension keeps the shoes pressed against the drum, create slack at the cable adjuster or equalizer as described in the service information. Remove the caliper and hang it from the suspension with wire so it never hangs by the flexible brake hose. Do not press the brake pedal while the caliper is off, and do not open any hydraulic connection; this job does not require touching the brake fluid.
Remove the caliper bracket so the rotor can come off. If the rotor will not slide off, the shoes may be catching a ridge in the drum. Back off the star-wheel adjuster through the access opening instead of hammering on the rotor, which can damage the adjuster, the shoes or the backing plate.
Before disassembly, photograph the shoe assembly and work on one side at a time so the other side remains a reference. Remove the return springs, adjuster and hold-down springs, then disconnect the parking brake cable from the shoe actuating lever. Note each spring's position and which end of the adjuster faces which shoe. Inspect the backing plate for oil, rust buildup on the shoe contact points and damage to the cable end.
Install and restore the system
Clean the backing plate and apply a thin film of high-temperature brake grease to the raised pads where the shoe edges ride. Keep grease, oil and fingerprints off the friction material. Clean and lightly lubricate the adjuster threads. Adjusters can be side-specific, so do not swap them between the left and right wheels. Fit the shoes in the same orientation shown in your photo, reconnect the cable to the actuating lever, then install the hold-down springs, adjuster and return springs. Confirm every spring is fully seated and the shoes sit squarely on the backing plate.
Adjust the shoes before final assembly. With a brake shoe gauge, set the shoe diameter just under the drum diameter. Without one, turn the star wheel until the rotor slides on with a light drag, then back it off slightly so the rotor turns freely. Reinstall the rotor, caliper bracket and caliper, tightening the fasteners to the values in the service information. Restore any cable slack you created, then perform the shoe burnishing procedure if the service information specifies one. New shoes may hold poorly until they have seated against the drum. Refit the wheel and torque the lug nuts to specification in a crisscross pattern.
Check the completed work
Before lowering the vehicle, spin each rear wheel by hand. Slight drag is normal, but binding or scraping means the adjustment or hardware needs attention. Apply the parking brake lever and confirm the wheels will not turn, then release it and confirm they spin freely again. With the engine running, press the brake pedal to confirm it is firm and at its normal height. The brake fluid level should be unchanged, because the hydraulic system was not opened.
Lower the vehicle and road test at low speed in a safe area. Then test the parking brake on a moderate slope, with your foot ready on the service brake. The red brake warning lamp should come on when the lever is applied and go off when it is fully released.
Further diagnosis is needed if lever travel remains excessive, the rear wheels run hot or smell burnt, the warning lamp stays lit, the vehicle pulls under braking, or oil appears on the new shoes. If anything affects normal stopping, such as a low or soft pedal or a fluid leak, stop driving the vehicle and have the brakes inspected professionally.