2011 Ram 1500 Brake Fluid Level Sensor: Identification and Location
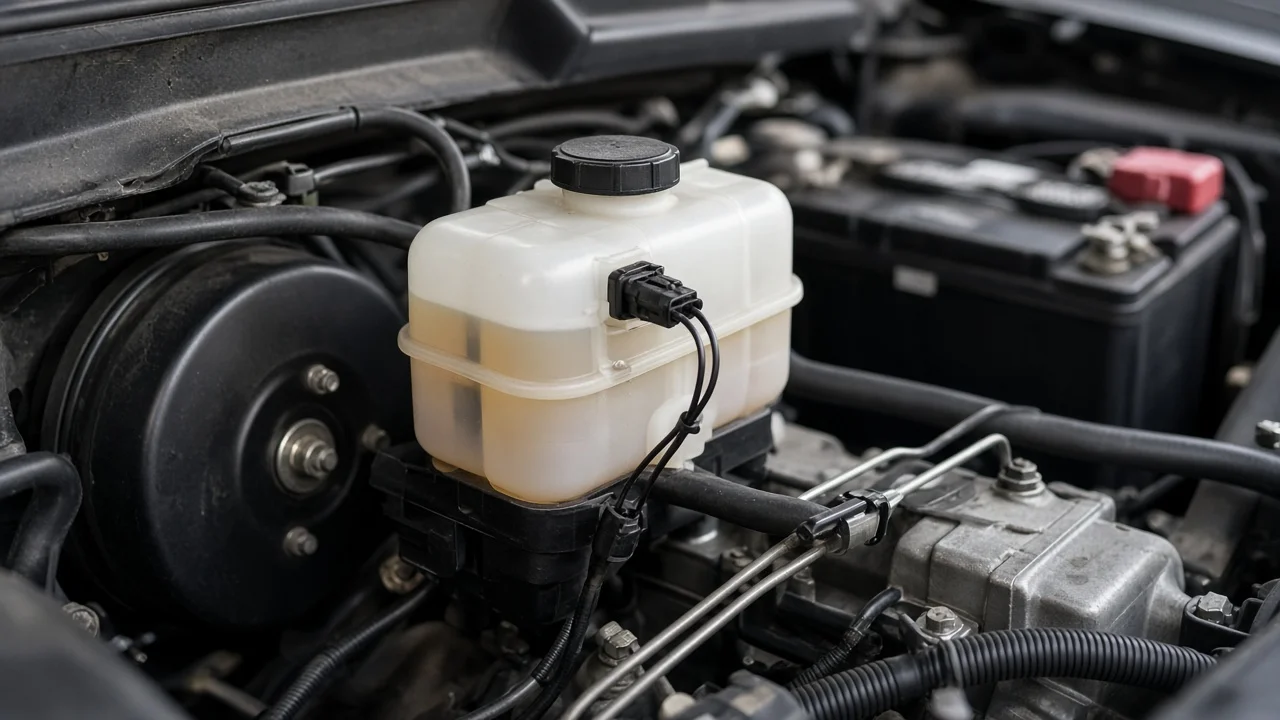
On a 2011 Ram 1500, the brake fluid level sensor is a small float-operated switch fitted to the master cylinder reservoir. Its only job is to tell the instrument cluster when fluid drops below a safe point, which turns on the red brake warning light. Finding it is easy once you know where the master cylinder sits. Deciding whether the sensor or the brake system itself is at fault takes more care, and that decision matters more than the part.
Where the sensor is and how to recognize it
Open the hood and look at the driver side of the engine compartment, against the firewall. The large round canister there is the vacuum brake booster, and the master cylinder is bolted to its front. On top of the master cylinder sits a translucent plastic reservoir with a screw-on cap and level marks molded into its side. The fluid level sensor is mounted in the reservoir body, usually toward its lower portion, and you can identify it by the electrical connector and small wiring harness plugged into it. It is the only electrical component on the reservoir, so tracing that harness leads you straight to the sensor.
The sensor is typically serviced separately from the reservoir. It is held in place by a clip or locking tabs and sealed into its bore so fluid cannot escape around it. Orientation and retention details can differ between factory parts and replacement units, so compare what you see on your truck with the part you intend to buy, and confirm vehicle fitment by VIN rather than by model year alone.
How the level sensor works
Inside the reservoir, a float carrying a small magnet rides on the surface of the brake fluid. The sensor body contains a magnetically operated switch. While the fluid is above the threshold, the float holds the magnet in one position; when the level falls far enough, the float drops, the switch changes state and the cluster turns on the brake warning lamp or displays a related message. This is a two-state switch, not a gauge. It does not measure how much fluid is in the reservoir, only whether the level is above or below one fixed point.
There are two common reasons for the level to fall. The first is normal brake pad wear: as the friction material wears thinner, the caliper pistons sit farther out, and more fluid stays in the calipers instead of the reservoir. The level therefore drops slowly over the life of the brake pads. The second is a leak somewhere in the hydraulic system, such as at a caliper, a flexible hose, a steel line fitting or the master cylinder itself. A gradual drop that matches pad wear is expected; a noticeable drop over days or weeks is not.
What changes the diagnosis
The red brake warning lamp is shared by more than one input. It comes on when the parking brake is applied, when the fluid level switch reports a low level, and on many trucks of this era when the anti-lock brake system detects a fault affecting brake force distribution. A lit lamp therefore does not automatically point to the level sensor. If the amber ABS lamp is on at the same time, the anti-lock system deserves attention first. If the red lamp flickers during hard braking, cornering or on slopes, the fluid is probably sitting right at the switch threshold and sloshing past it.
Parts also change the picture. A replacement reservoir or master cylinder may arrive with or without a level sensor, so you may need to transfer the original or buy one separately. Heavy-duty Ram models use different brake hardware from the 1500, so do not assume components interchange across the lineup. Checking fitment by VIN avoids most of these mismatches.
What you can check yourself
Park on level ground with the engine off, wipe the reservoir clean and read the fluid against the marks. If it is at or below the minimum line, look at the brake pads before adding fluid. Pads close to their wear limits explain a low reading, and when new pads are installed the caliper pistons are pushed back, sending fluid back up into the reservoir. Topping up to the maximum line with worn pads can cause overflow later. Inspect the brake rotors at the same time, since they have their own minimum thickness and are often replaced or measured along with the pads.
Next, look for leaks: wet spots or residue on the inside of the wheels, around each caliper, along hose ends and line fittings, and at the joint between the master cylinder and the booster. Fluid that needs repeated topping up points to a leak, and the truck should not be driven until it is found. When adding fluid, use only the type printed on the reservoir cap or listed in the owner's manual, keep the container sealed because brake fluid absorbs moisture, and never mix in silicone-based fluid.
If the level is correct, the parking brake is fully released and the lamp stays on, inspect the sensor connector for corrosion, a broken locking tab or damaged wires. The switch can be tested with a multimeter for a change in continuity as the float moves, but follow the service procedure for which state is correct, because the expected reading depends on the circuit design. To replace the sensor, unplug the connector, release the retainer and pull the unit out, expecting a little fluid to seep. Protect painted surfaces, because brake fluid damages paint.
Limitations and when to get professional help
Connector style, retaining method and electrical test values can vary, so factory service information for your specific VIN is the reliable reference for removal and testing. Keep in mind that a sensor working correctly is reporting a real condition. Unplugging it or replacing it just to switch off the light can hide a leak or worn brakes, and the warning will no longer protect you.
Stop driving and have the truck inspected or towed if the pedal feels soft, sinks slowly under steady pressure or travels close to the floor, if fluid is visibly leaking, or if the warning lamp appears together with grinding or pulling. A professional brake technician can read stored codes from the anti-lock module with a scan tool, pressure-check the hydraulic system and confirm whether the problem is the sensor, the wiring or the brakes themselves.